> ## Documentation Index
> Fetch the complete documentation index at: https://docs.cloudify.biz/llms.txt
> Use this file to discover all available pages before exploring further.
# Customer Settings
## Customer Sync Rules
### **Define Search Parameters**
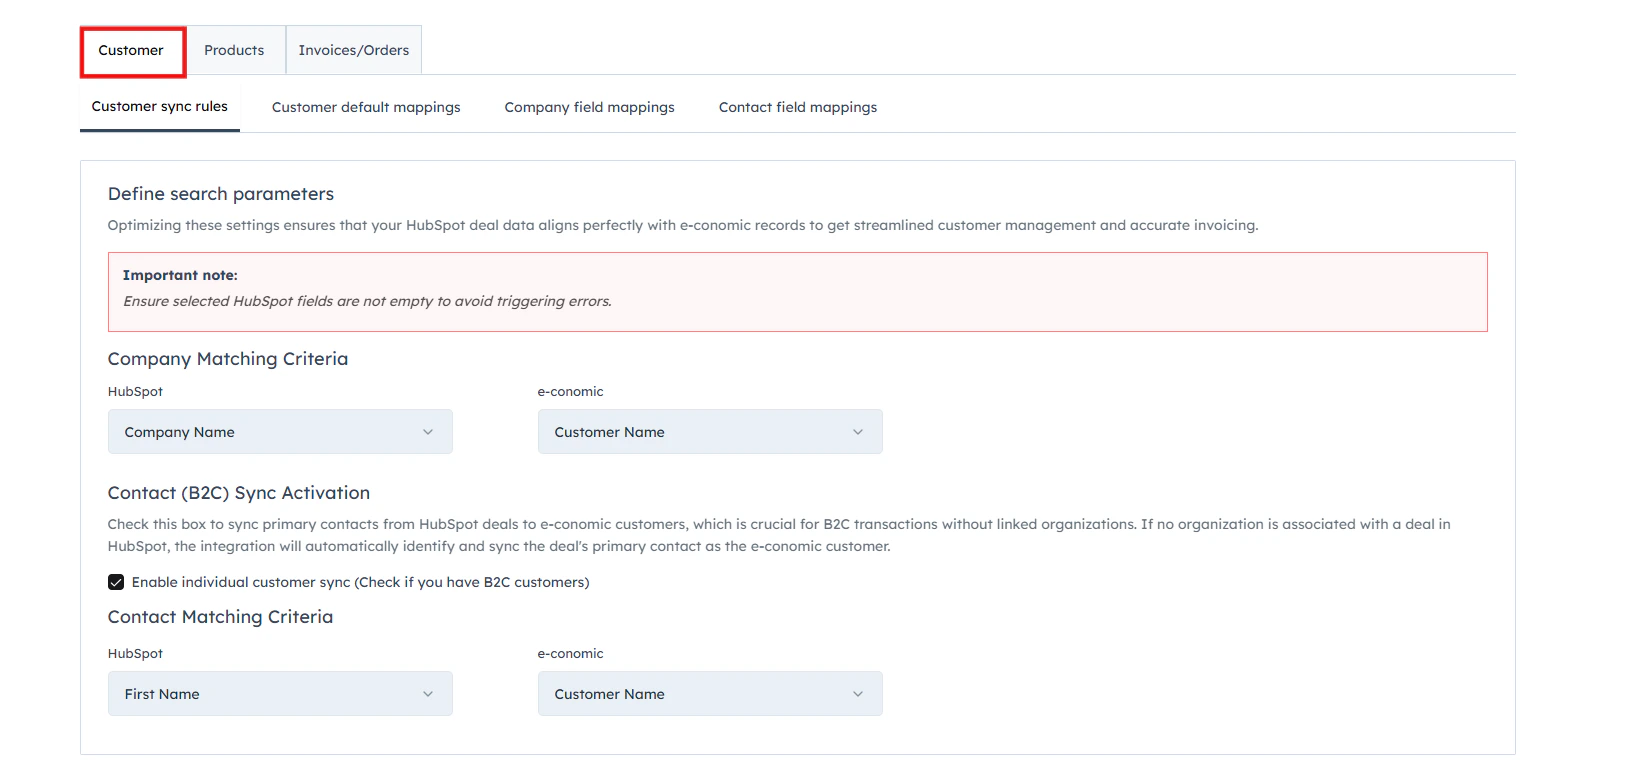
Set search preferences to match HubSpot companies with e-conomic customers using specific fields, reducing duplicates by verifying existing records. Select a field (such as Company Name) from a drop-down in HubSpot for the customer sync rules and select a corresponding field (Customer Name) from the drop-down in e-conomic. Click "**Save**".
 ### **Enable Primary Sync Contact**
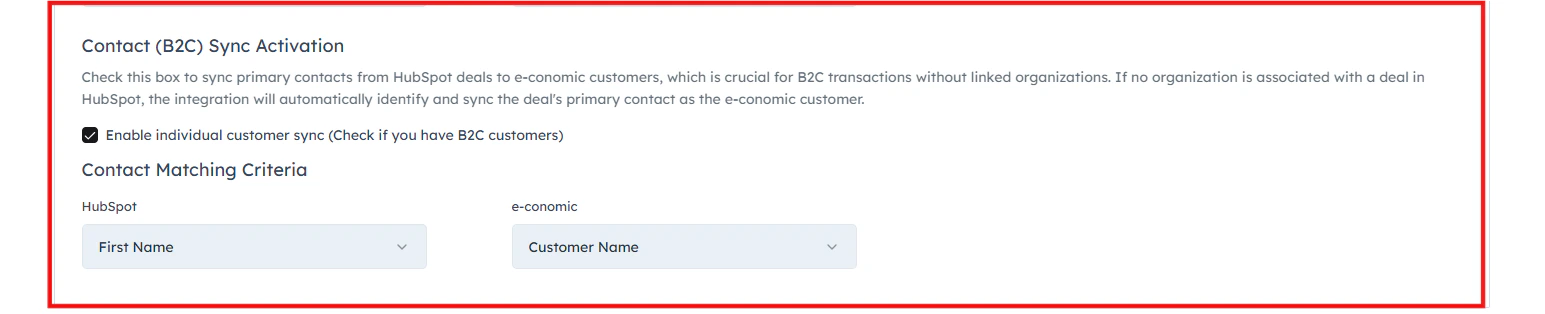
This feature is essential for businesses dealing directly with consumers, allowing seamless addition of individual contacts from HubSpot to e-conomic as customers when there's no associated company. Therefore, if this is the case, check “**Enable Primary Sync Contact**.” From the "**HubSpot Contact Identifier**" dropdown menu, select the HubSpot field that uniquely identifies your contacts, such as person name and email.
From the "**E-conomic Contact Field**" dropdown menu, select the corresponding field in e-conomic that should be used to match and identify the same contact. This should also be a unique identifier like an email address or customer number in e-conomic. Click "**Next**".
### **Enable Primary Sync Contact**
This feature is essential for businesses dealing directly with consumers, allowing seamless addition of individual contacts from HubSpot to e-conomic as customers when there's no associated company. Therefore, if this is the case, check “**Enable Primary Sync Contact**.” From the "**HubSpot Contact Identifier**" dropdown menu, select the HubSpot field that uniquely identifies your contacts, such as person name and email.
From the "**E-conomic Contact Field**" dropdown menu, select the corresponding field in e-conomic that should be used to match and identify the same contact. This should also be a unique identifier like an email address or customer number in e-conomic. Click "**Next**".
 * **Select one of two options for handling the customer number when a company is created in e-conomic**: You can select whether e-conomic creates the customer or takes the account number from Hubspot when creating new customer records.
 ### e-conomic Customer Number Field
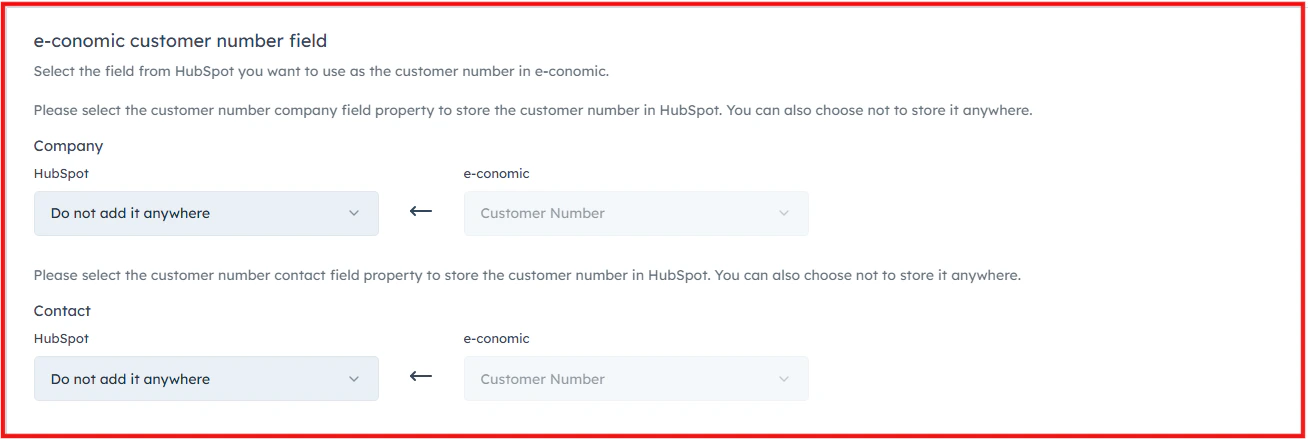
This option is conditional based on the previous selection.In this step, you will choose where the **e-conomic Customer Number** should be stored in HubSpot. This helps maintain a clear link between HubSpot records and customers created in e-conomic.
## Company Mapping
Select the **HubSpot company property** where the **e-conomic Customer Number** should be stored.
* Use the dropdown under **HubSpot** to select an existing company field.
* If you prefer **not to store the customer number in HubSpot**, select **“Do not add it anywhere.”**
* The selected value will map to **Customer Number** in e-conomic.
### e-conomic Customer Number Field
This option is conditional based on the previous selection.In this step, you will choose where the **e-conomic Customer Number** should be stored in HubSpot. This helps maintain a clear link between HubSpot records and customers created in e-conomic.
## Company Mapping
Select the **HubSpot company property** where the **e-conomic Customer Number** should be stored.
* Use the dropdown under **HubSpot** to select an existing company field.
* If you prefer **not to store the customer number in HubSpot**, select **“Do not add it anywhere.”**
* The selected value will map to **Customer Number** in e-conomic.
 ## Contact Mapping
You can also choose to store the **e-conomic Customer Number** in a **HubSpot contact property**.
* Select the contact field from the dropdown under **HubSpot**.
* This will map to **Customer Number** in e-conomic.
* If you do not want to store the number in a contact field, select **“Do not add it anywhere.”**
**Tip:** Storing the customer number in HubSpot makes it easier to track and sync customers between HubSpot and e-conomic in future updates.
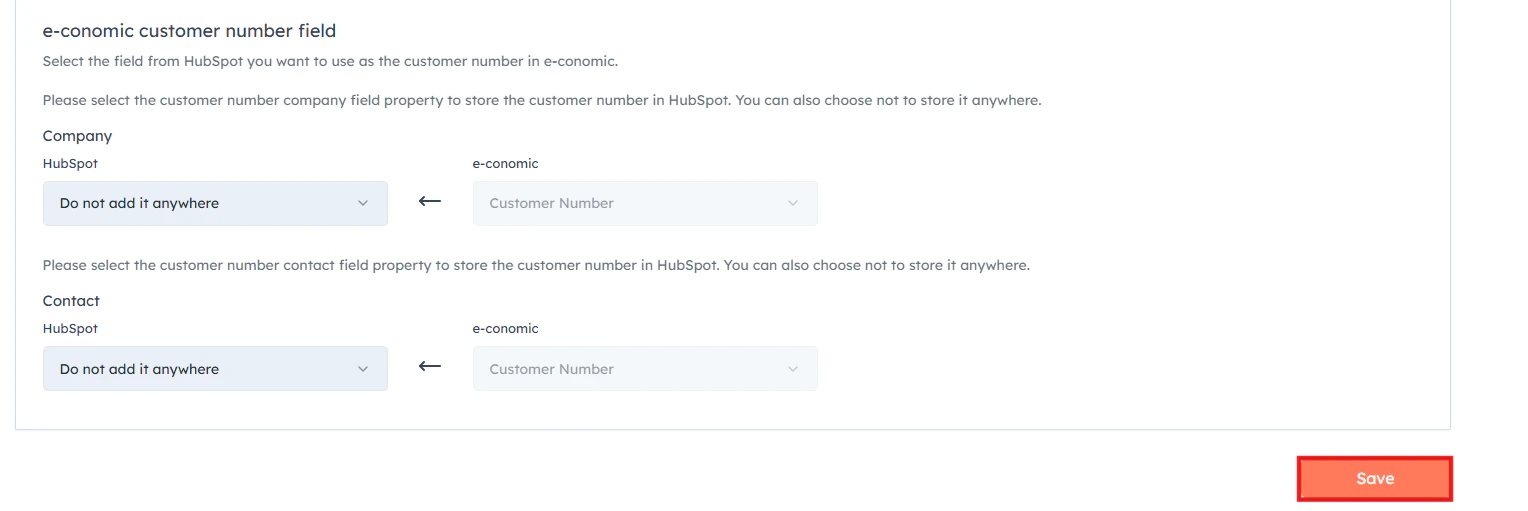
After you have selected the parameters, scroll down and click "**Save**".
## Contact Mapping
You can also choose to store the **e-conomic Customer Number** in a **HubSpot contact property**.
* Select the contact field from the dropdown under **HubSpot**.
* This will map to **Customer Number** in e-conomic.
* If you do not want to store the number in a contact field, select **“Do not add it anywhere.”**
**Tip:** Storing the customer number in HubSpot makes it easier to track and sync customers between HubSpot and e-conomic in future updates.
After you have selected the parameters, scroll down and click "**Save**".
 ## Customer Default Mappings
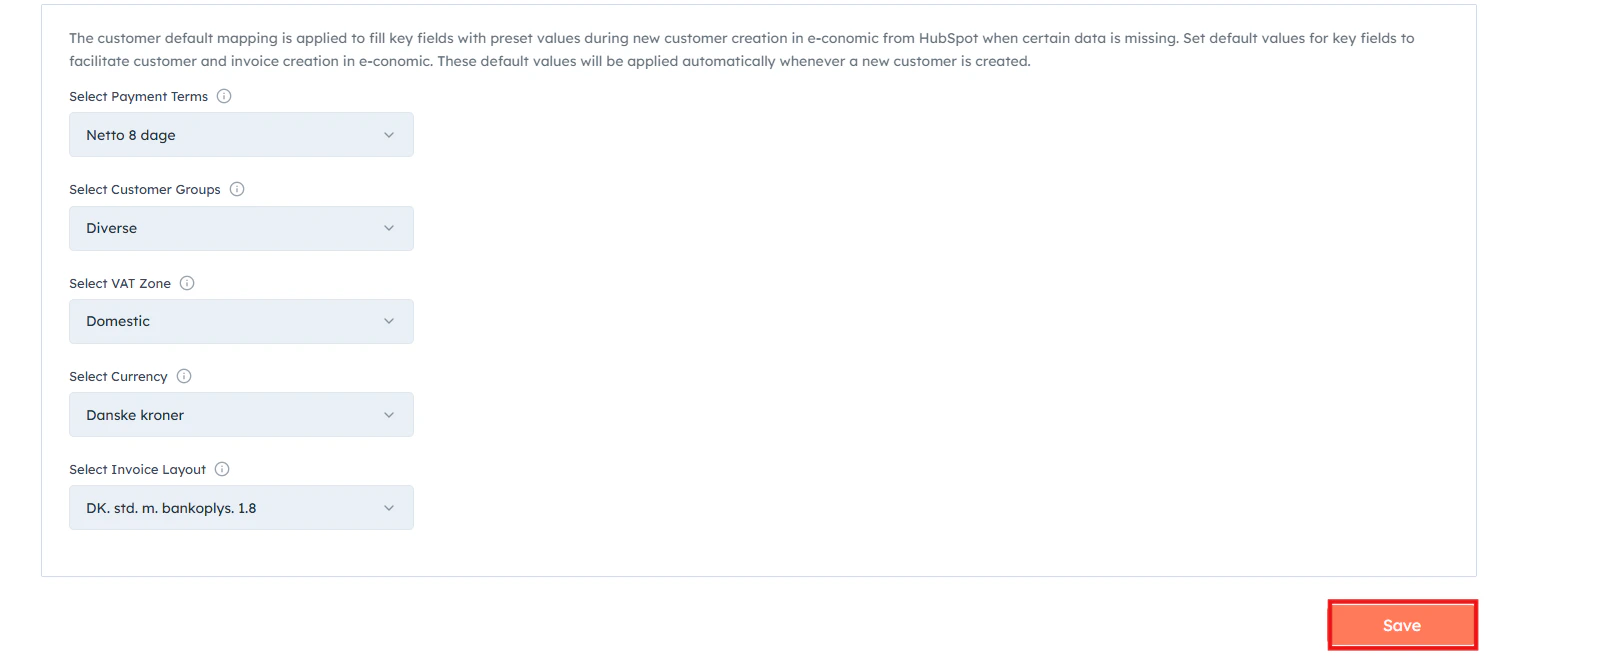
This step allows you to set **default values** that will automatically be applied when a **new customer is created in e-conomic from HubSpot**. These defaults help ensure that important fields are filled even if the data is missing in HubSpot.
**Configure the following fields according to your business requirements:**
* **Payment Terms**
Choose the **default payment terms** that will be assigned to new customers in e-conomic.\
Example: *Netto 8 dage*.
* **Customer Group**
Select the **customer group** where newly created customers should be categorized in e-conomic.\
Example: *Diverse*.
* **VAT Zone**
Select the **VAT zone** that will apply to the customer for taxation purposes.\
Example: *Domestic*.
* **Currency**
Choose the **default currency** that will be used for invoices created for the customer.\
Example: *Danske kroner*.
* **Invoice Layout**
Select the **invoice template/layout** that will be used when generating invoices for the customer in e-conomic.
**Tip:** These values will be applied automatically whenever a new customer is created, ensuring consistent and error-free invoice creation.
Once you have configured the settings, click **Save** to apply the default mappings.
## Customer Default Mappings
This step allows you to set **default values** that will automatically be applied when a **new customer is created in e-conomic from HubSpot**. These defaults help ensure that important fields are filled even if the data is missing in HubSpot.
**Configure the following fields according to your business requirements:**
* **Payment Terms**
Choose the **default payment terms** that will be assigned to new customers in e-conomic.\
Example: *Netto 8 dage*.
* **Customer Group**
Select the **customer group** where newly created customers should be categorized in e-conomic.\
Example: *Diverse*.
* **VAT Zone**
Select the **VAT zone** that will apply to the customer for taxation purposes.\
Example: *Domestic*.
* **Currency**
Choose the **default currency** that will be used for invoices created for the customer.\
Example: *Danske kroner*.
* **Invoice Layout**
Select the **invoice template/layout** that will be used when generating invoices for the customer in e-conomic.
**Tip:** These values will be applied automatically whenever a new customer is created, ensuring consistent and error-free invoice creation.
Once you have configured the settings, click **Save** to apply the default mappings.
 ## Company Field Mapping
Company field mapping controls how **customer data from HubSpot is transferred to e-conomic**. By mapping fields correctly, you ensure that company information from HubSpot is synced to the appropriate customer fields in e-conomic.
You can customize these mappings based on your business requirements.
## Company Field Mapping
Company field mapping controls how **customer data from HubSpot is transferred to e-conomic**. By mapping fields correctly, you ensure that company information from HubSpot is synced to the appropriate customer fields in e-conomic.
You can customize these mappings based on your business requirements.
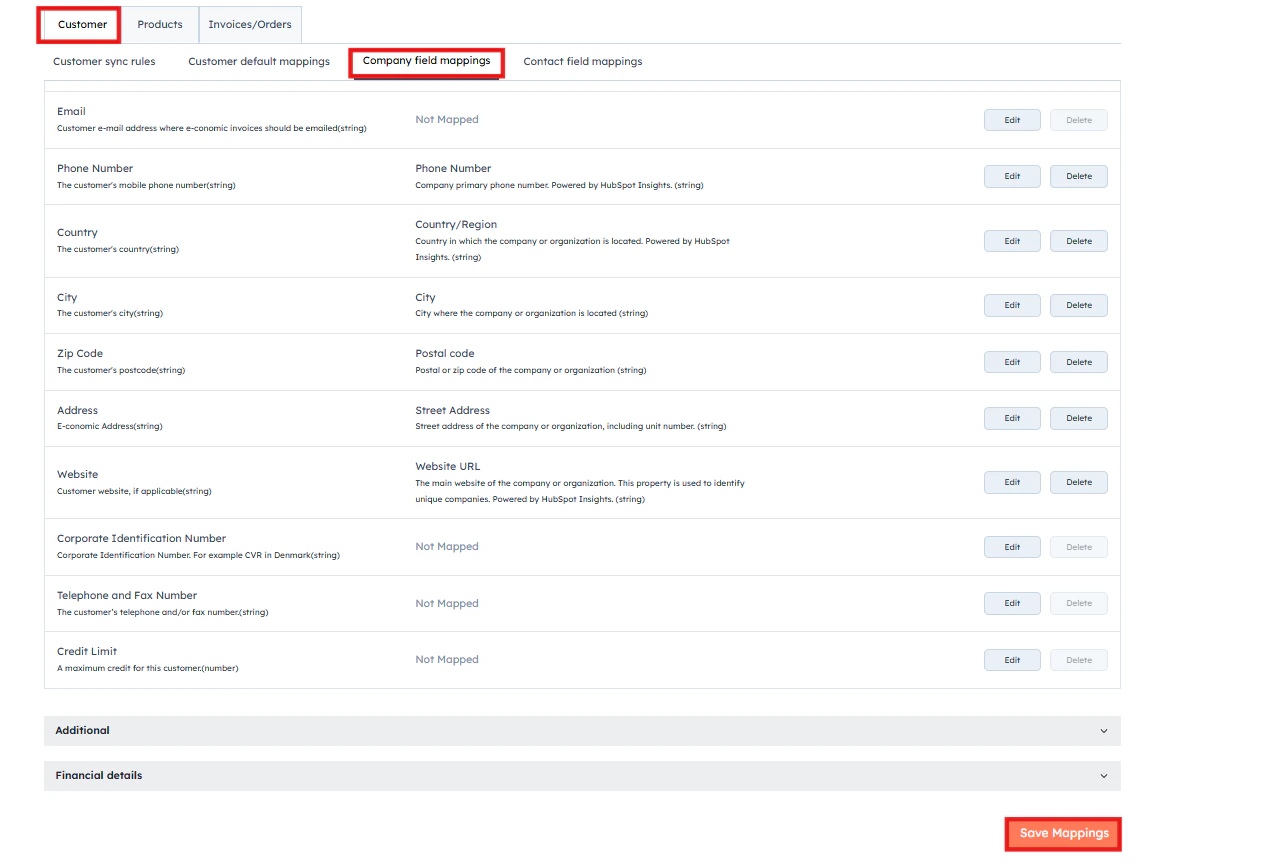 Once all necessary mappings are configured, click "**Save Mappings"** to apply your changes.
## Contact Field Mappings
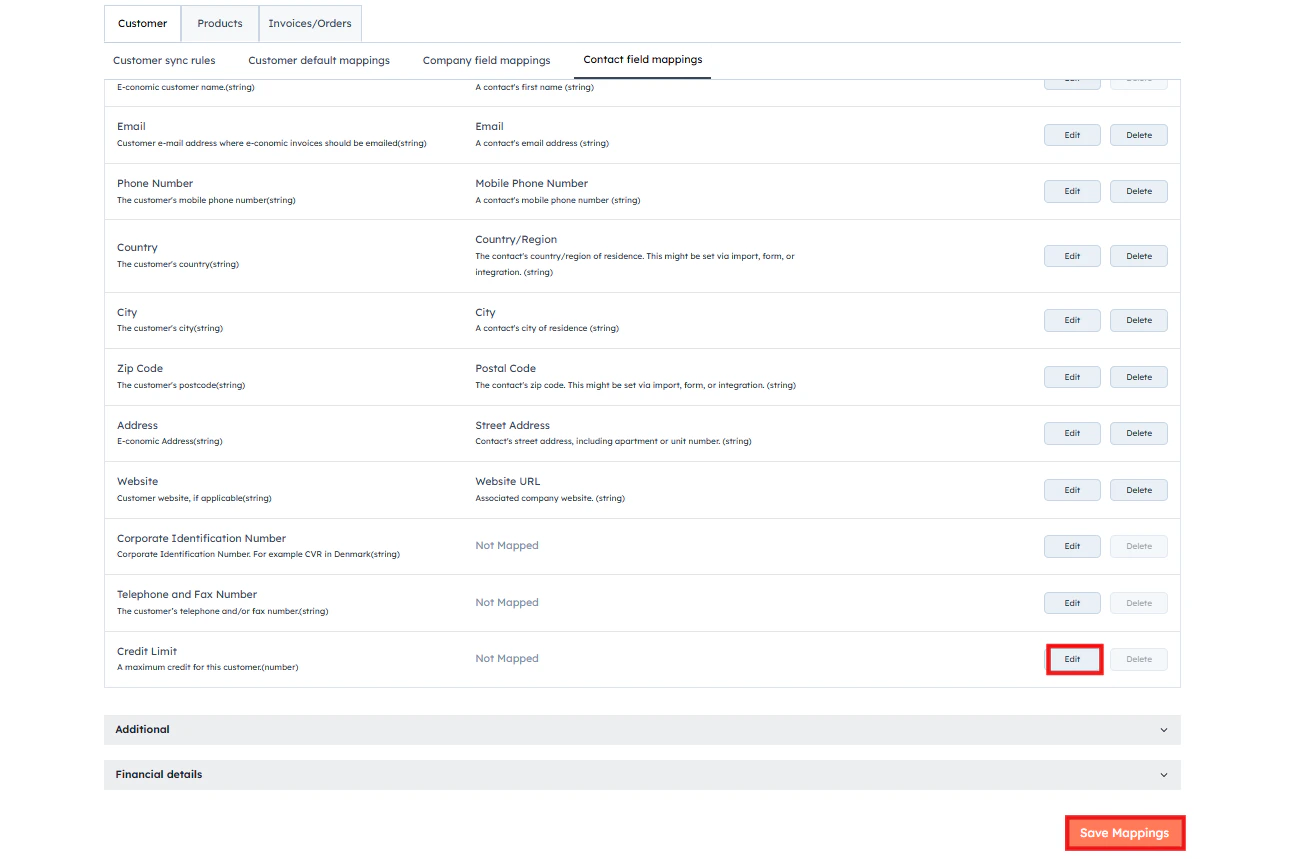
Define the field mapping between HubSpot contact and e-conomic customers. This step shows how customer data will flow from HubSpot to e-conomic during the creation of a new customer. You can customize these mappings according to your specific business requirements by clicking "**Edit**" > Select the HubSpot field from the drop-down box and click "**Save Mappings**".
Once all necessary mappings are configured, click "**Save Mappings"** to apply your changes.
## Contact Field Mappings
Define the field mapping between HubSpot contact and e-conomic customers. This step shows how customer data will flow from HubSpot to e-conomic during the creation of a new customer. You can customize these mappings according to your specific business requirements by clicking "**Edit**" > Select the HubSpot field from the drop-down box and click "**Save Mappings**".