> ## Documentation Index
> Fetch the complete documentation index at: https://docs.cloudify.biz/llms.txt
> Use this file to discover all available pages before exploring further.

# One-click Invoices/Quotes

> Access the manual sync window directly within HubSpot through UI Extensions to create and sync invoices or quotes to Xero.

You can access the manual sync window directly within HubSpot through UI Extensions. Follow the steps below to add this panel to your HubSpot view.

***

## Setting Up the UI Extension
<Steps>
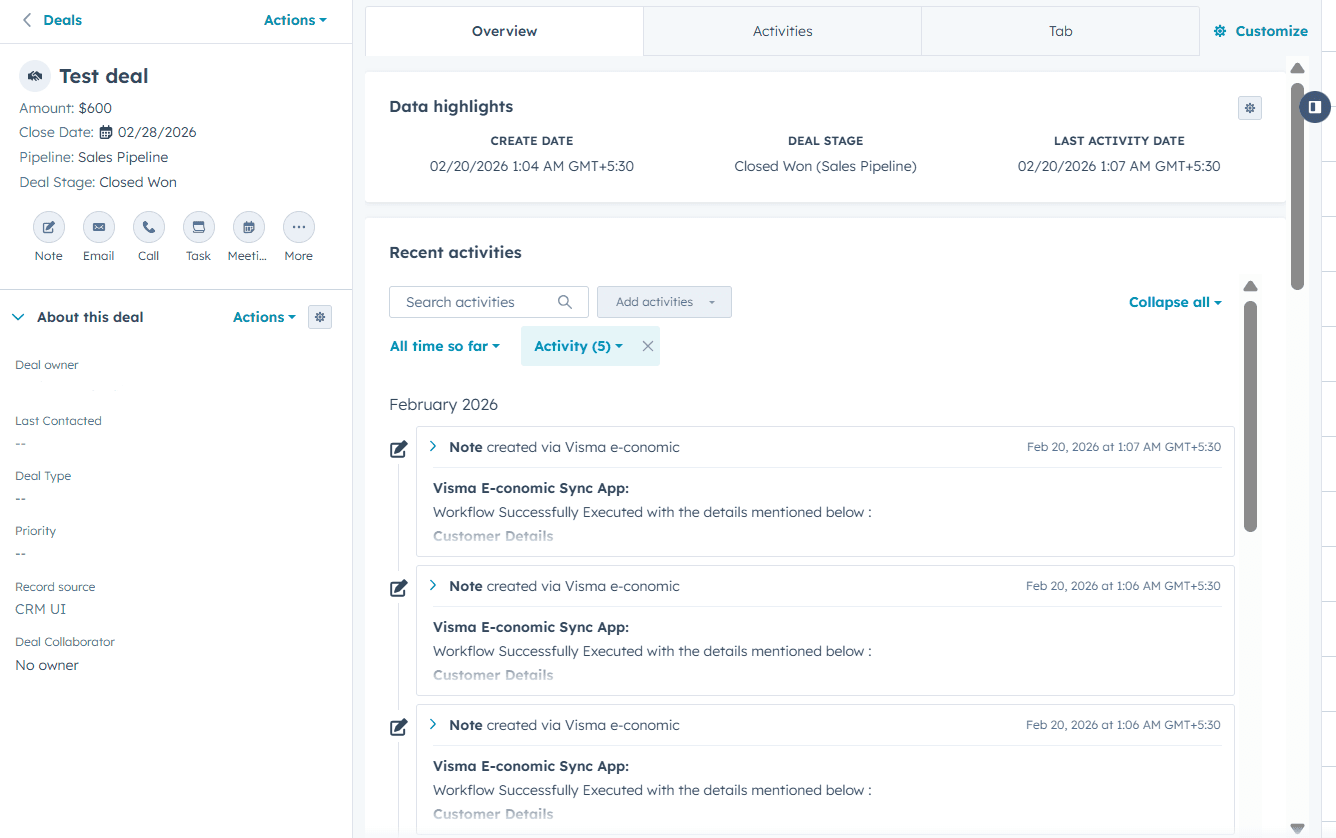
  <Step title="Open a Deal in HubSpot">
    <Frame>
      ![Open any Deal in HubSpot](https://framerusercontent.com/images/vbZbHpsgoeQtut0KAEPoBXfqoI0.png)
    </Frame>
  </Step>

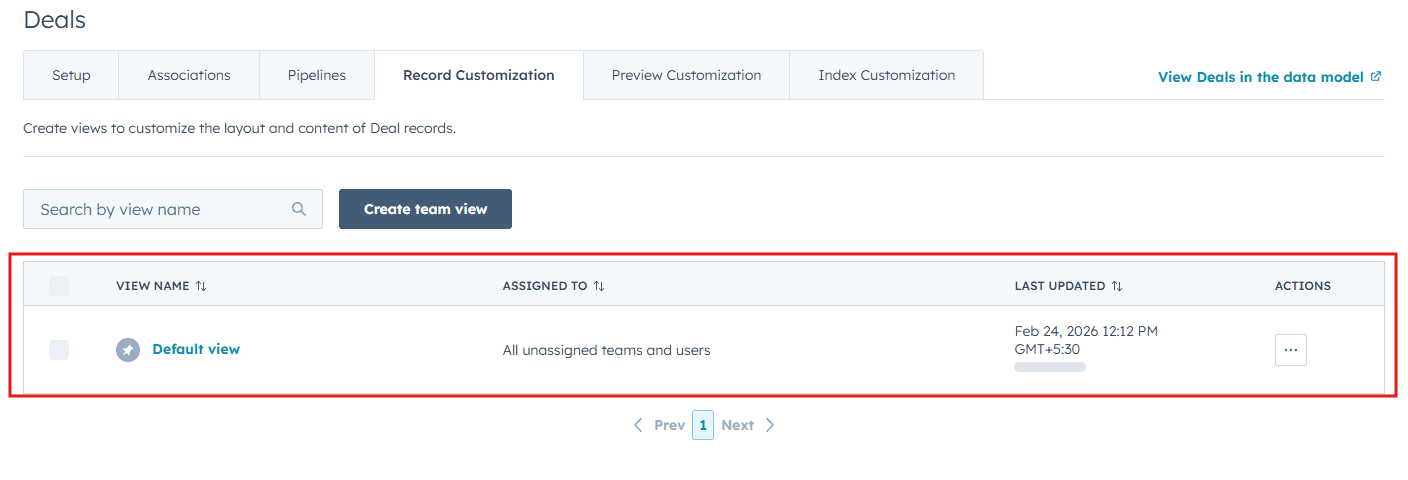
  <Step title="Customize the Default view">
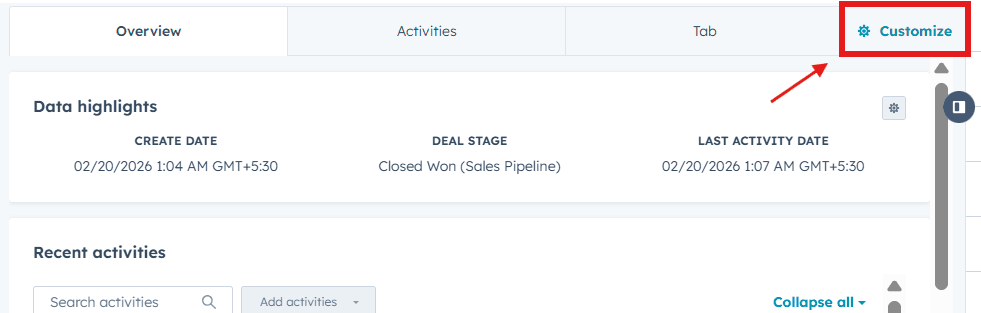
    Click **Customize** and select **Default view**.
    <Frame>
      ![Click Customize in the Deal view](https://framerusercontent.com/images/vK9i7hqnnQlTHgfZcC6SygPOgc.png)
    </Frame>

    <Frame>
      ![Select Default view from the Customize menu](https://framerusercontent.com/images/UdMaxpY16KX8hEEFjSK12Rbtcw8.png)
    </Frame>
  </Step>

  <Step title="Add a new card">
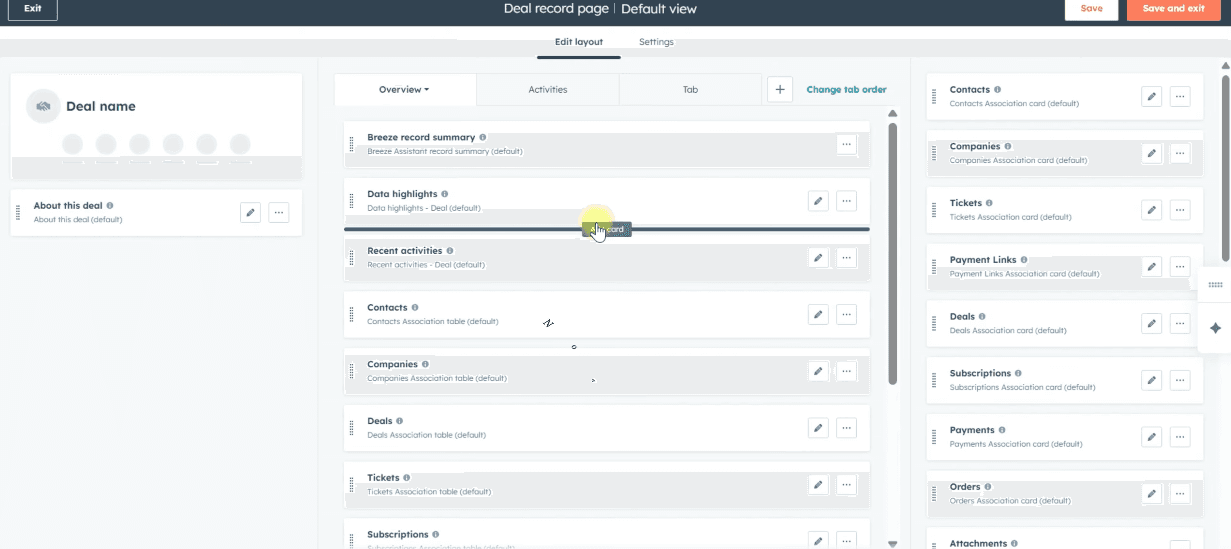
    Under **Edit layout**, click the **+** icon where you want to place the card.
    <Frame>
      ![Click the + icon in Edit layout to add a new card](https://framerusercontent.com/images/7Q6GYJUVE4n01fKTpXA6KeLKY.png)
    </Frame>
  </Step>

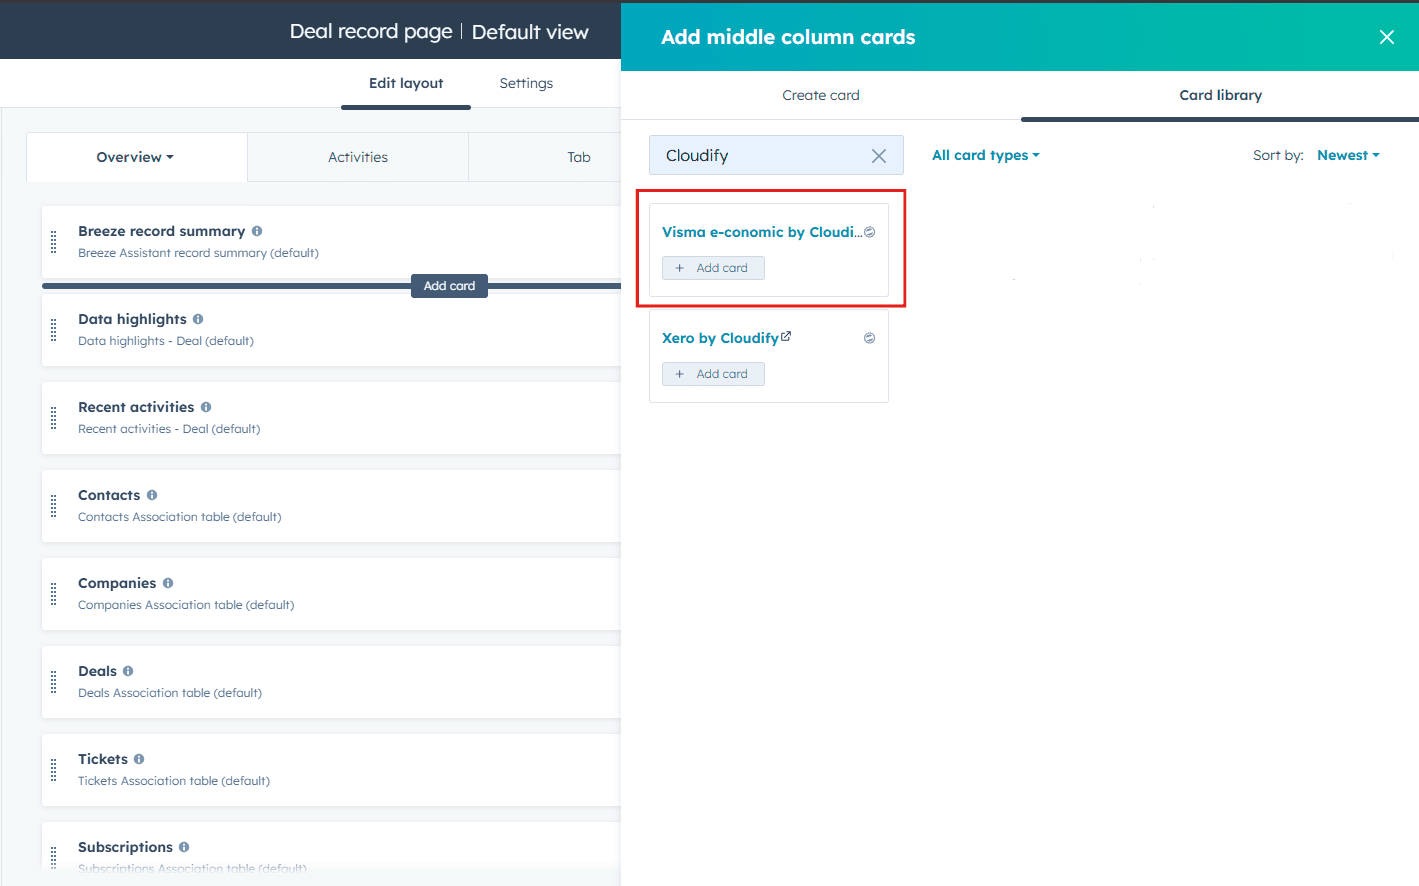
  <Step title="Search for and add the Cloudify card">
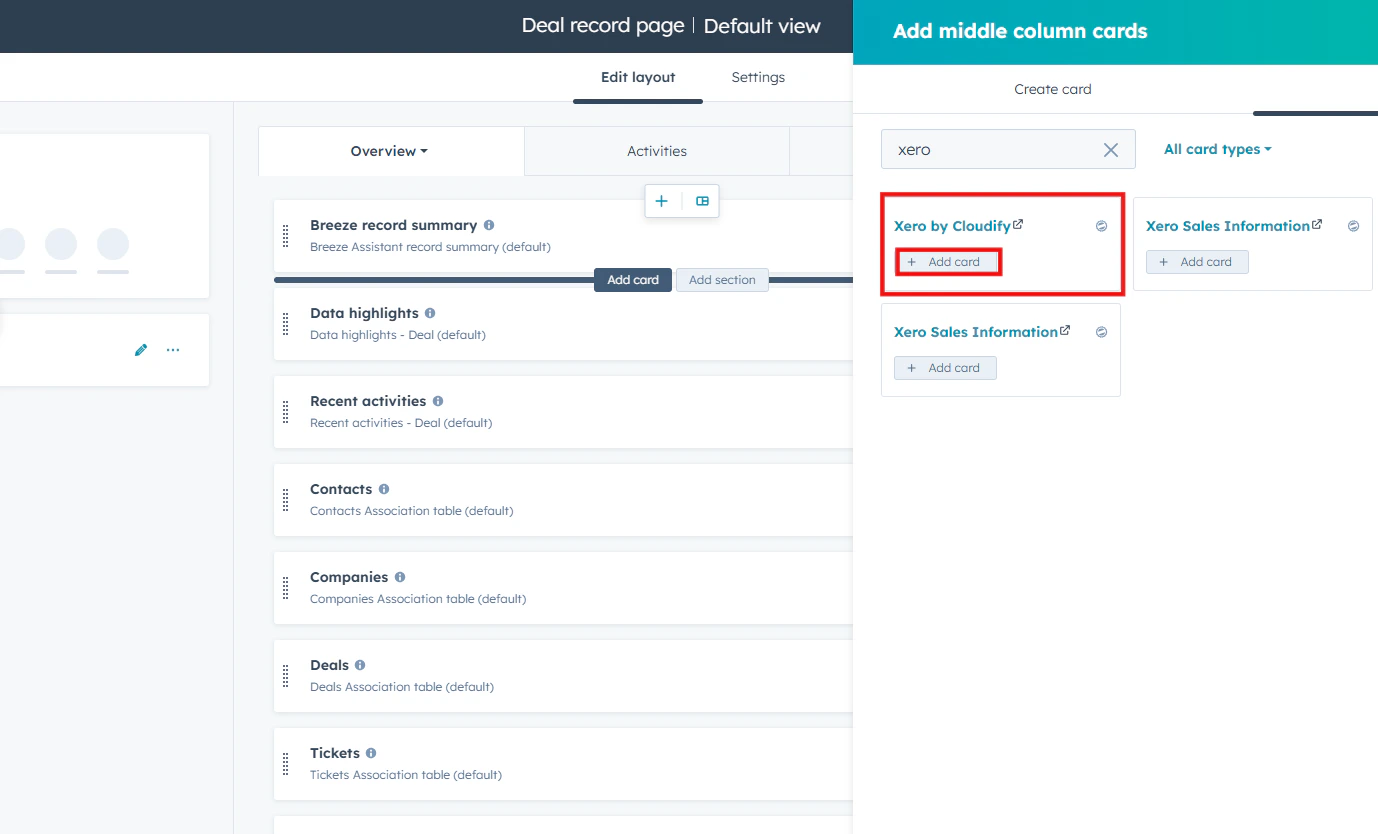
    Search for **Xero by Cloudify** in the Card Library, then click **Add card**.
    <Frame>
      <img alt="Search for Visma e-conomic by Cloudify in the Card Library and click Add card" lightAlt="Search for Visma e-conomic by Cloudify in the Card Library and click Add card" darkAlt="Search for Visma e-conomic by Cloudify in the Card Library and click Add card" src="https://mintcdn.com/cloudify-c7720744/vbRT_M1td7Th601K/images/Screenshot-2026-04-12-122027.png?fit=max&auto=format&n=vbRT_M1td7Th601K&q=85&s=23b5e67f7eea6b3c79f8cd046b6a348f" className="dark:hidden" width="1378" height="834" data-path="images/Screenshot-2026-04-12-122027.png" />

      <img alt="Search for Visma e-conomic by Cloudify in the Card Library and click Add card" lightAlt="Search for Visma e-conomic by Cloudify in the Card Library and click Add card" darkAlt="Search for Visma e-conomic by Cloudify in the Card Library and click Add card" src="https://framerusercontent.com/images/hKaNpiG5iKpY50AmTHOSme3tJpE.png" className="hidden dark:block" />
    </Frame>
  </Step>

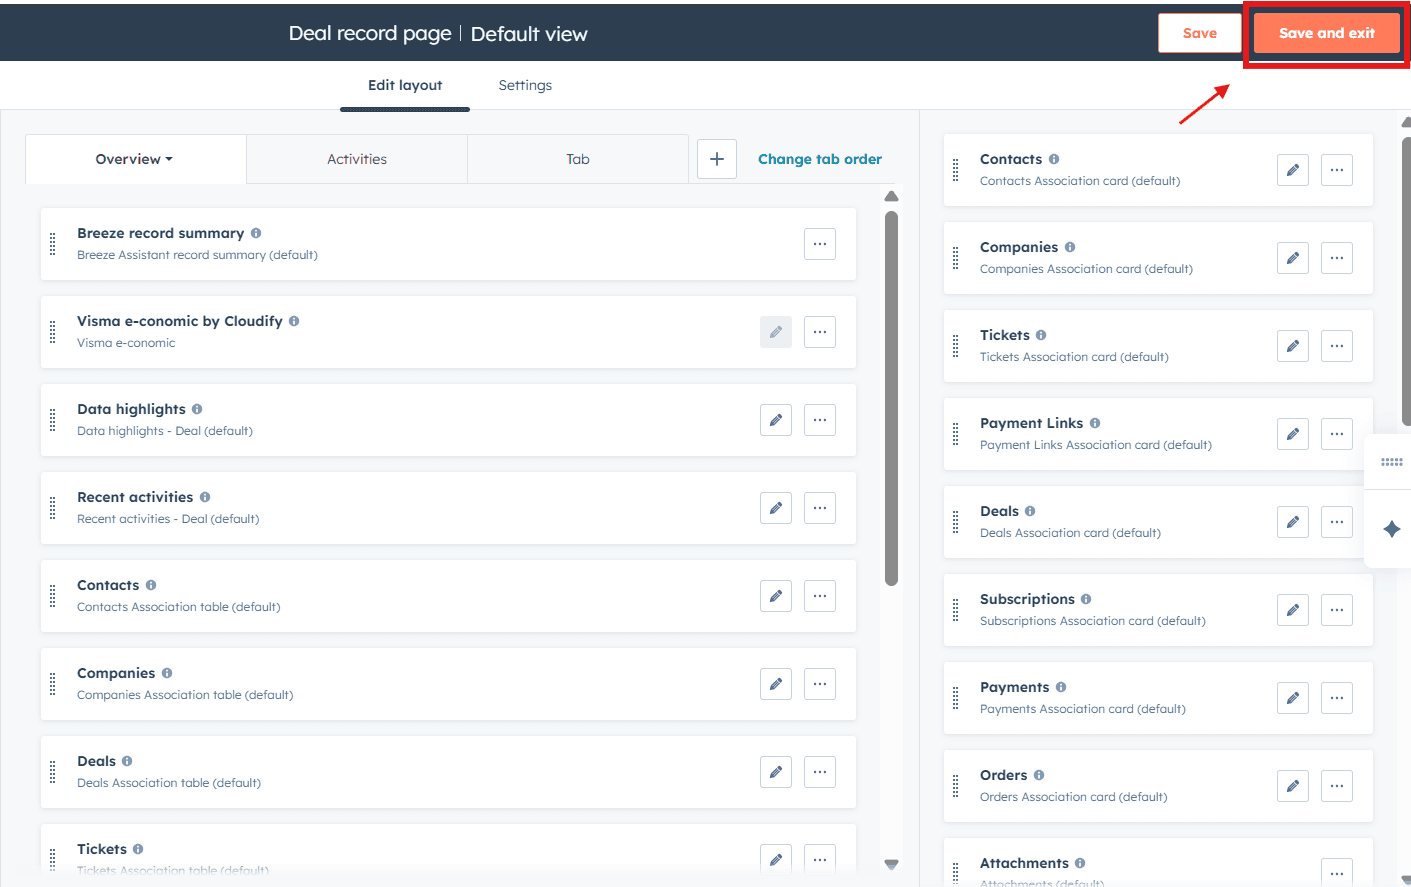
  <Step title="Save and Exit">
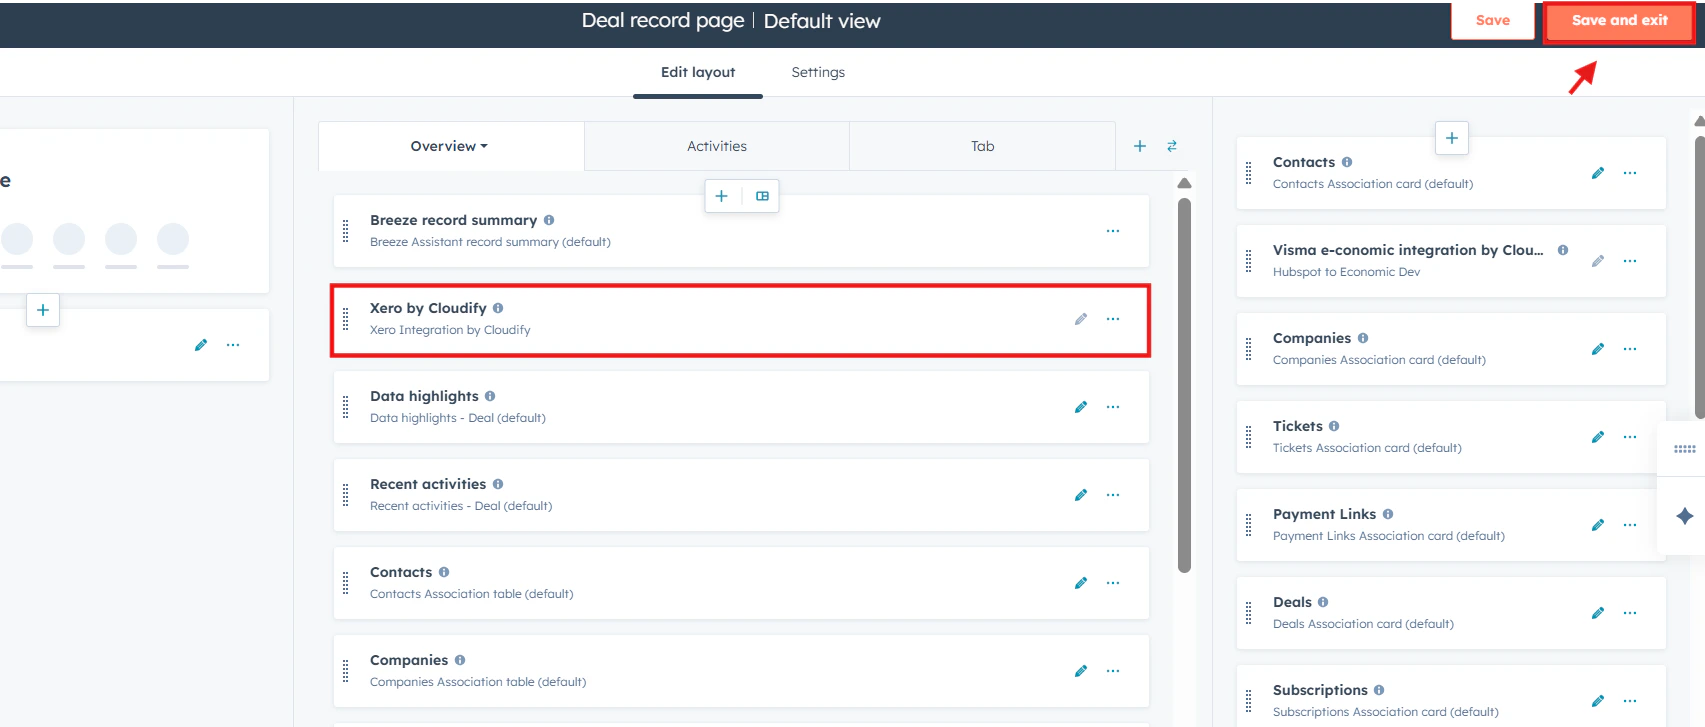
    Click **Save and Exit** to apply the layout changes.
    <Frame>
      <img alt="Click Save and Exit to save the layout" lightAlt="Click Save and Exit to save the layout" darkAlt="Click Save and Exit to save the layout" src="https://mintcdn.com/cloudify-c7720744/vbRT_M1td7Th601K/images/Screenshot-2026-04-12-122211.png?fit=max&auto=format&n=vbRT_M1td7Th601K&q=85&s=8af26d9b7fa6bc7ab644bb7bde37cbe9" className="dark:hidden" width="1705" height="727" data-path="images/Screenshot-2026-04-12-122211.png" />

      <img alt="Click Save and Exit to save the layout" lightAlt="Click Save and Exit to save the layout" darkAlt="Click Save and Exit to save the layout" src="https://framerusercontent.com/images/m79OClGDgBuamarXVwMUwUDOWLo.png" className="hidden dark:block" />
    </Frame>
  </Step>
</Steps>

***

## Creating an Invoice, Order, or Quote

<Steps>
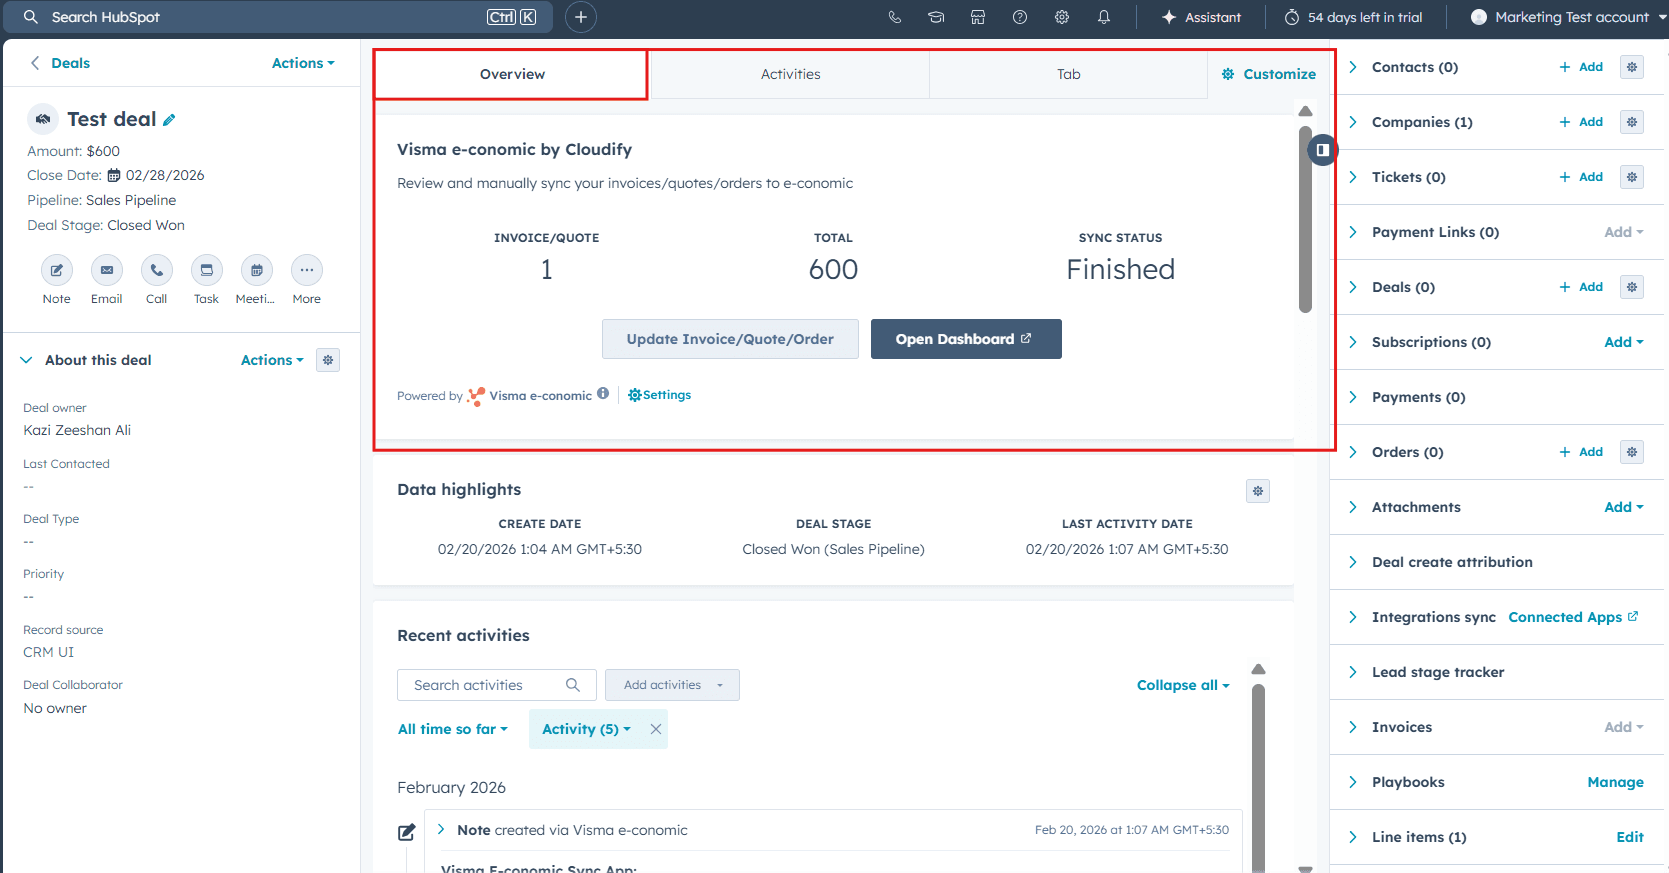
  <Step title="Access the UI extension">
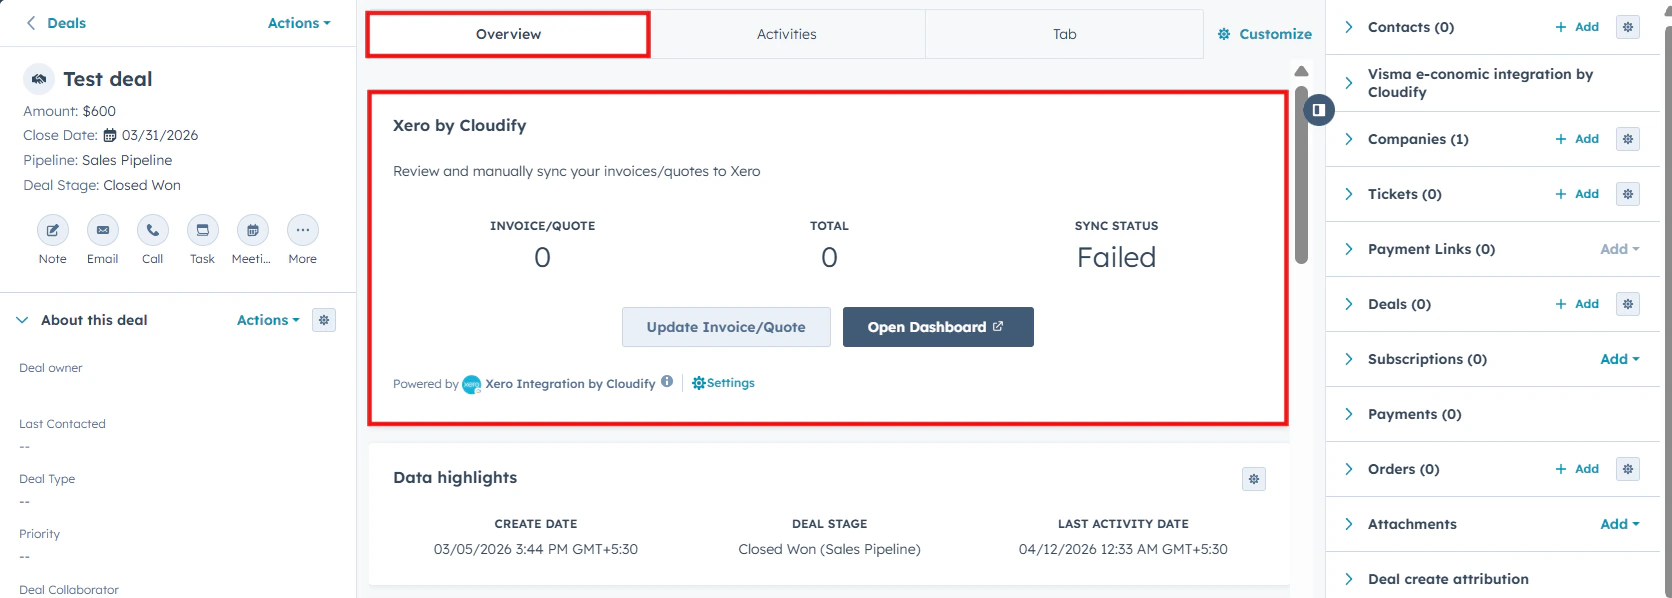
    Access the UI extension under the **Overview** tab of any Deal.
    <Frame>
      <img alt="Access the Visma e-conomic by Cloudify UI extension under the Overview tab" lightAlt="Access the Visma e-conomic by Cloudify UI extension under the Overview tab" darkAlt="Access the Visma e-conomic by Cloudify UI extension under the Overview tab" src="https://mintcdn.com/cloudify-c7720744/vbRT_M1td7Th601K/images/Screenshot-2026-04-12-122445.png?fit=max&auto=format&n=vbRT_M1td7Th601K&q=85&s=67190dc7bb6fd8bcb78564e480e088e8" className="dark:hidden" width="1672" height="598" data-path="images/Screenshot-2026-04-12-122445.png" />

      <img alt="Access the Visma e-conomic by Cloudify UI extension under the Overview tab" lightAlt="Access the Visma e-conomic by Cloudify UI extension under the Overview tab" darkAlt="Access the Visma e-conomic by Cloudify UI extension under the Overview tab" src="https://framerusercontent.com/images/o2ppeC2e1WS6ABs3U05GchylZc.png" className="hidden dark:block" />
    </Frame>
  </Step>

  <Step title="Create or update a record">
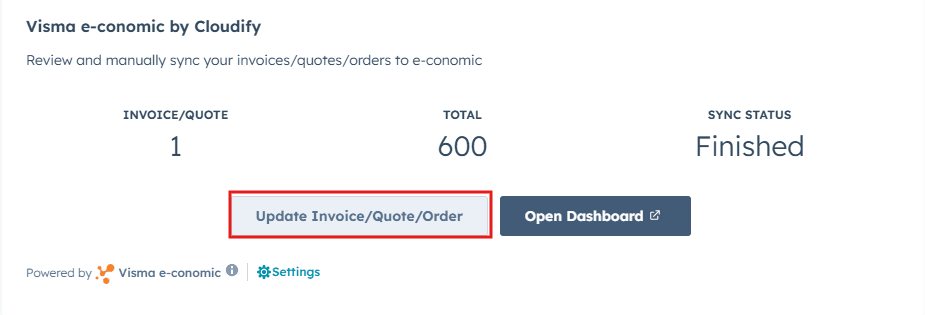
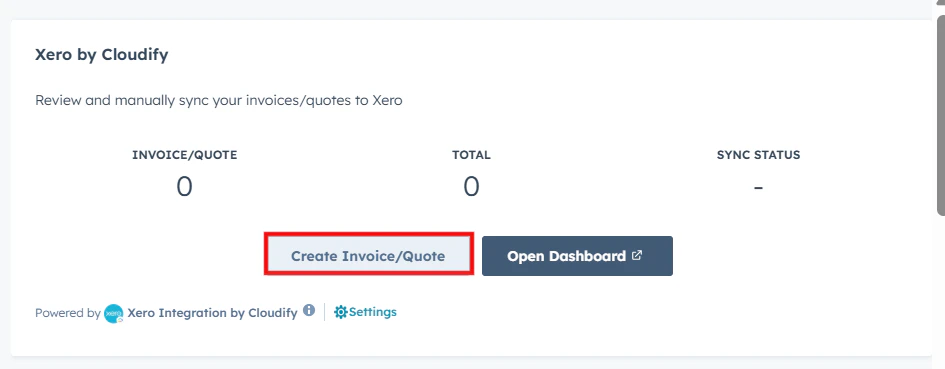
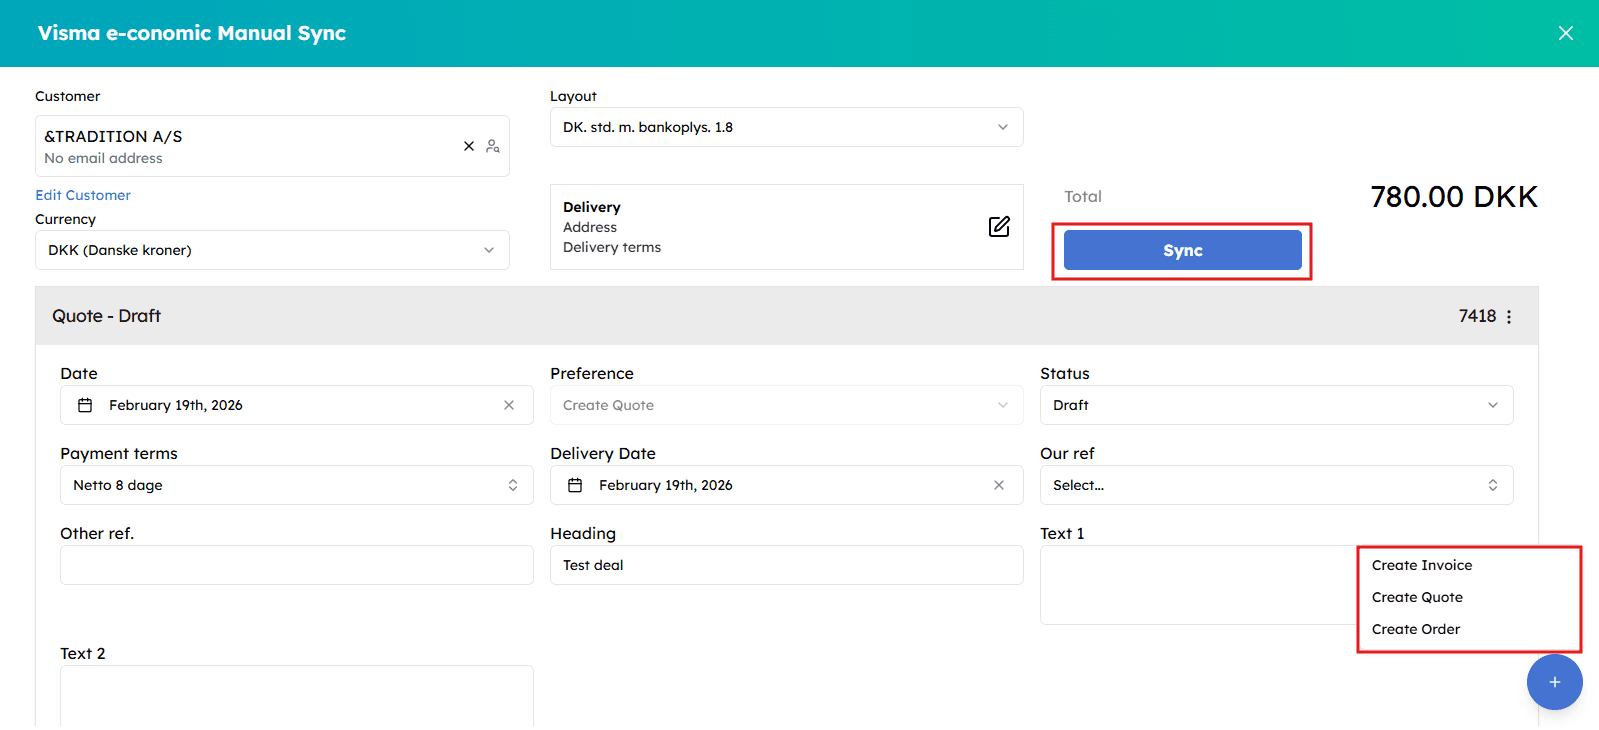
    Use **Update** or **Create Invoice or Quote** to manually sync your records to Xero.
    <Frame>
      <img alt="Use Update or Create Invoice, Order or Quote to sync records to e-conomic" lightAlt="Use Update or Create Invoice, Order or Quote to sync records to e-conomic" darkAlt="Use Update or Create Invoice, Order or Quote to sync records to e-conomic" src="https://mintcdn.com/cloudify-c7720744/vbRT_M1td7Th601K/images/Screenshot-2026-04-12-123110.png?fit=max&auto=format&n=vbRT_M1td7Th601K&q=85&s=a528d9433c5dcdaebfb7d155dc29d5c4" className="dark:hidden" width="945" height="369" data-path="images/Screenshot-2026-04-12-123110.png" />

      <img alt="Use Update or Create Invoice, Order or Quote to sync records to e-conomic" lightAlt="Use Update or Create Invoice, Order or Quote to sync records to e-conomic" darkAlt="Use Update or Create Invoice, Order or Quote to sync records to e-conomic" src="https://framerusercontent.com/images/It17yfpKmby14sCNaYd1rUDJafY.png" className="hidden dark:block" />
    </Frame>
  </Step>

  <Step title="Finalize and sync">
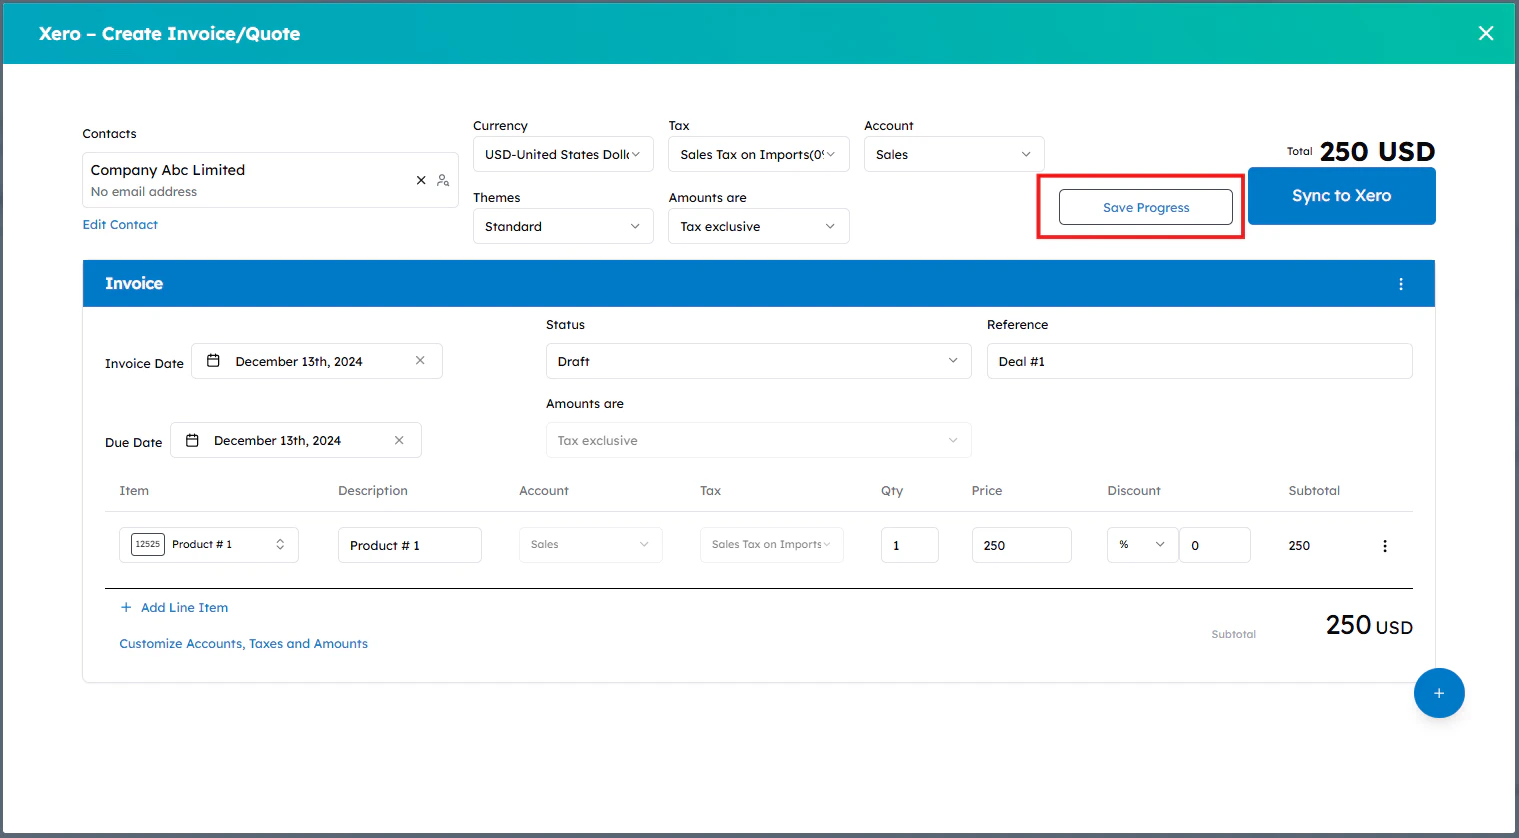
    Finalize the changes, select **Sync** to synchronize the invoice or quote, then select **Proceed**.
    <Frame>
      <img alt="Select Sync to synchronize the record" lightAlt="Select Sync to synchronize the record" darkAlt="Select Sync to synchronize the record" src="https://mintcdn.com/cloudify-c7720744/vbRT_M1td7Th601K/images/j9sKbByvCQfN0wWQDmChWEw8gOc.jpg?fit=max&auto=format&n=vbRT_M1td7Th601K&q=85&s=e2d0fc9876a18b86765e4f7448abe36c" className="dark:hidden" width="1519" height="838" data-path="images/j9sKbByvCQfN0wWQDmChWEw8gOc.jpg" />

      <img alt="Select Sync to synchronize the record" lightAlt="Select Sync to synchronize the record" darkAlt="Select Sync to synchronize the record" src="https://framerusercontent.com/images/DmEH1SX0VNUTFiEX4R0Dy88eQB8.png" className="hidden dark:block" />
    </Frame>
  </Step>

  <Step title="Confirm success">
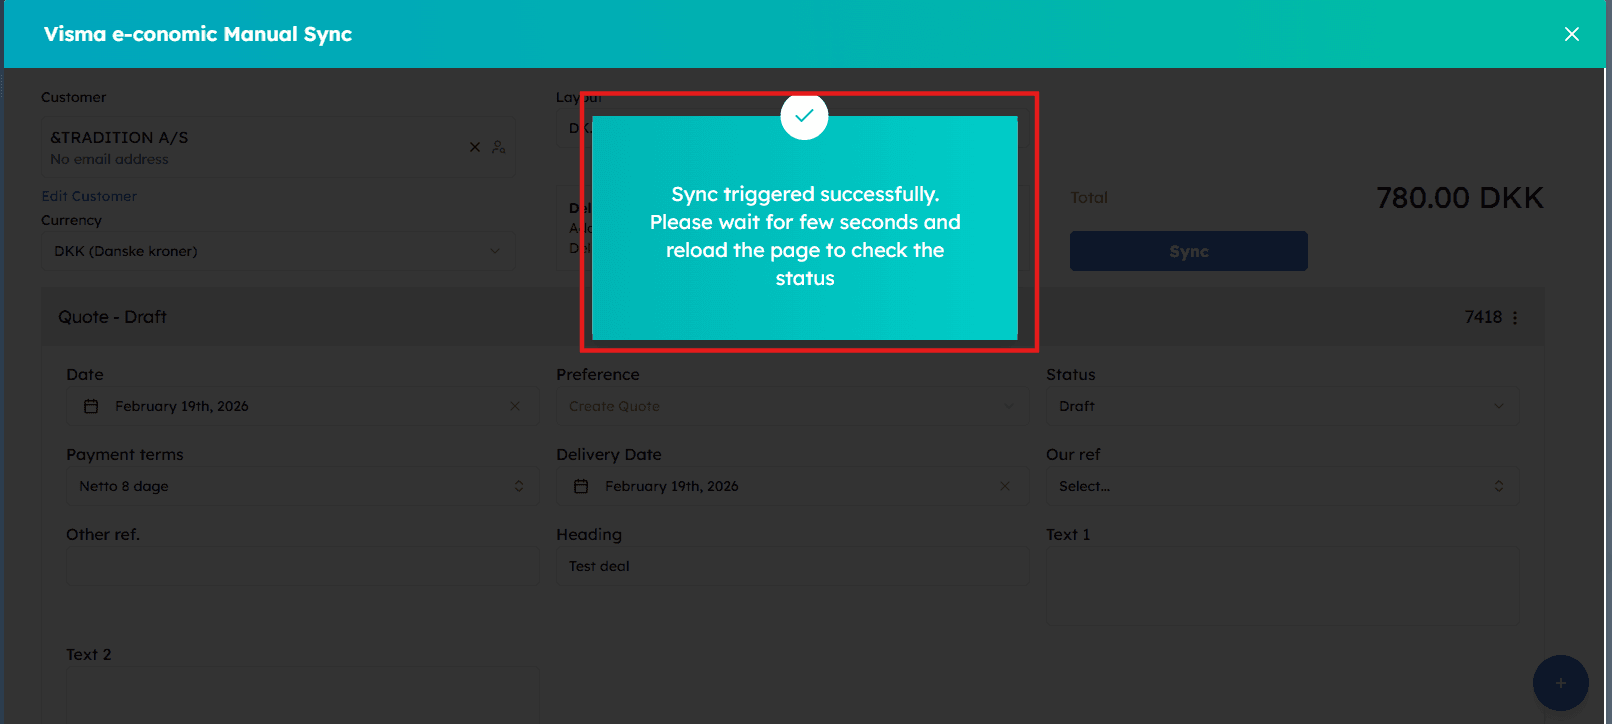
    A success window will appear confirming that the sync has been triggered. Wait a few seconds and reload the page to check the updated status.
    <Frame>
      ![Success window confirming the sync has been triggered](https://framerusercontent.com/images/IAUwuVaTd0RI75D3liqSAMG5Y.png)
    </Frame>

    <Frame />

    Your invoice or quote has been successfully created in Xero!
  </Step>
</Steps>