> ## Documentation Index
> Fetch the complete documentation index at: https://docs.cloudify.biz/llms.txt
> Use this file to discover all available pages before exploring further.

# Assign Template to a Customer on BC

Watch the video to understand how to assign a template to a customer when it's created on Business Central. Here, we show you how to add three mandatory posting-group fields in Business Central for your integration to run smoothly.

<Note>
  **Note**: Setting these default values are mandatory for the integration to run. If these default values are already set, then there is no need to set them again. If not already set, please follow the steps shared below
</Note>

<iframe src="https://www.youtube.com/embed/J-zdGHaIjkk" title="YouTube video player" frameborder="0" className="w-full aspect-video rounded-xl" allow="accelerometer; autoplay; clipboard-write; encrypted-media; gyroscope; picture-in-picture; web-share" allowfullscreen />

## Step-by-Step Instructions:

<Steps>
  <Step>
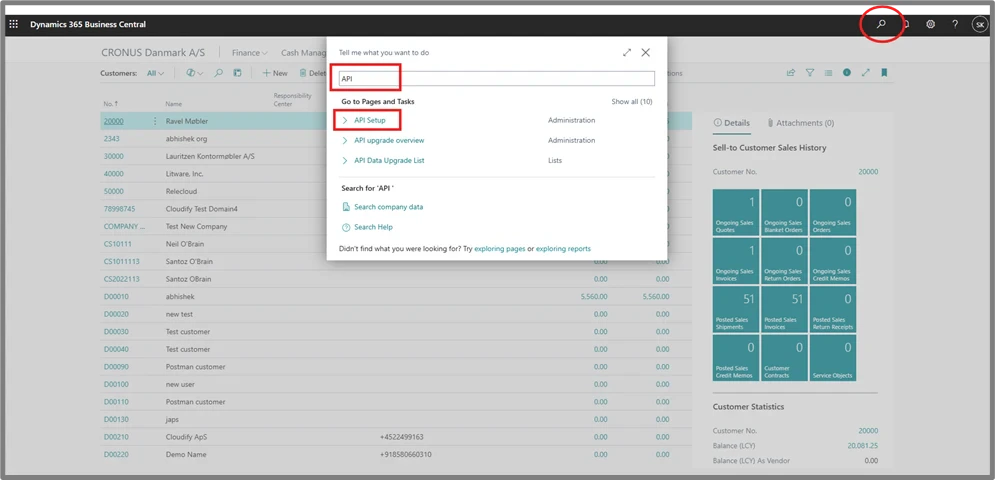
    Click on the search bar and type “**API”**. Select “**API Setup**” from the search result

    <Frame>
      <img src="https://mintcdn.com/cloudify-c7720744/lGXfg-sRr29fzWtD/images/image-525.png?fit=max&auto=format&n=lGXfg-sRr29fzWtD&q=85&s=dc6d0e52a95b9b90d75487a5b8241dd2" alt="Image" width="995" height="480" data-path="images/image-525.png" />
    </Frame>
  </Step>

  <Step>
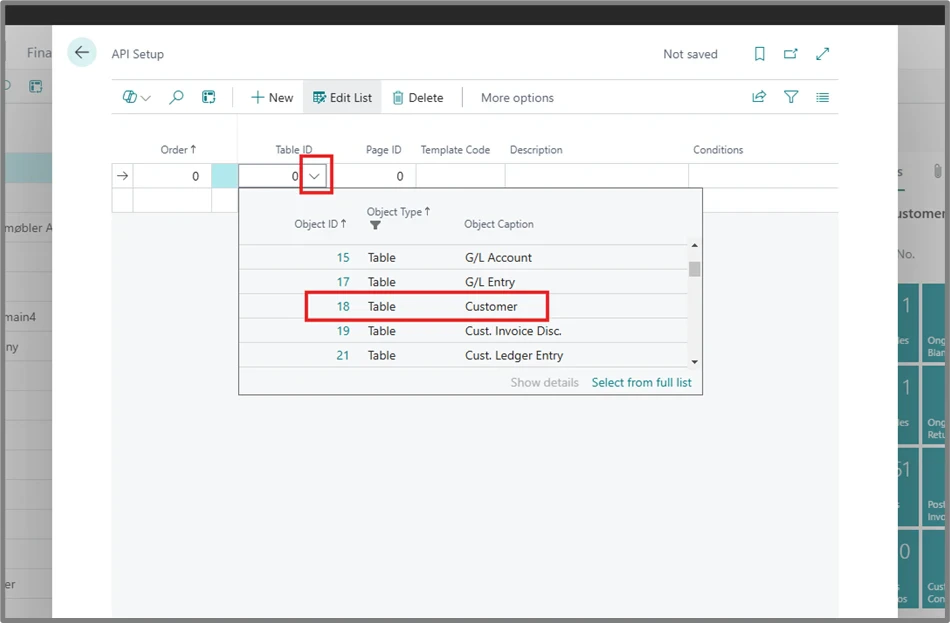
    Click on the drop-down button next to “**Table ID**” and select "**Customer**” from the list

    <Frame>
      <img src="https://mintcdn.com/cloudify-c7720744/lGXfg-sRr29fzWtD/images/image-526.png?fit=max&auto=format&n=lGXfg-sRr29fzWtD&q=85&s=9ae9050b4fc6e505365411f023657690" alt="Image" width="950" height="623" data-path="images/image-526.png" />
    </Frame>
  </Step>

  <Step>
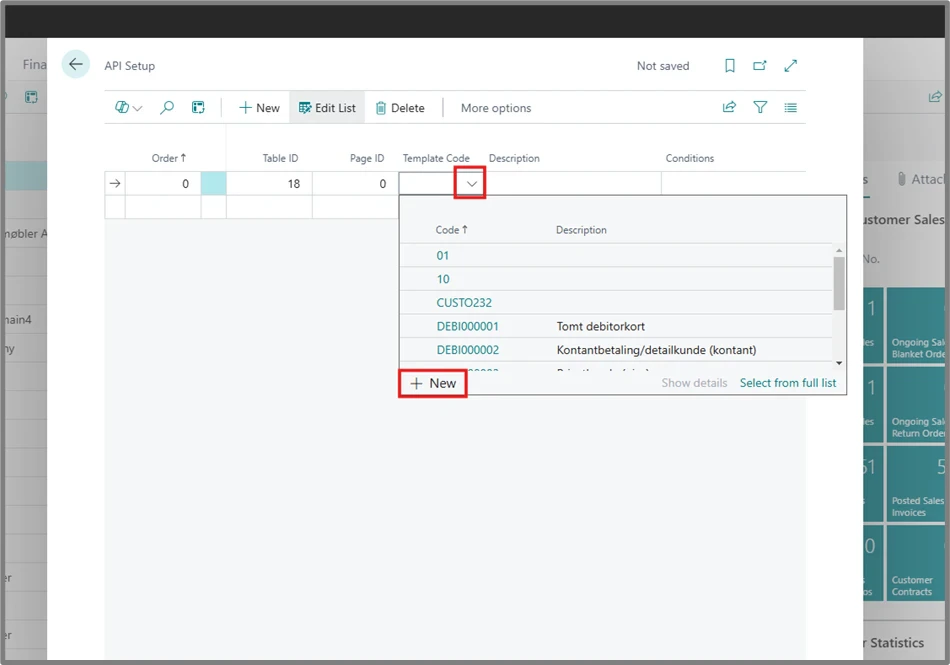
    Click on the drop-down in the "**Template Code**" field. Click on “**+ New**” button

    <Frame>
      <img src="https://mintcdn.com/cloudify-c7720744/lGXfg-sRr29fzWtD/images/image-527.png?fit=max&auto=format&n=lGXfg-sRr29fzWtD&q=85&s=a7b7a4c1d6f3b50d1a32ea9d58c5a56c" alt="Image" width="950" height="665" data-path="images/image-527.png" />
    </Frame>
  </Step>

  <Step>
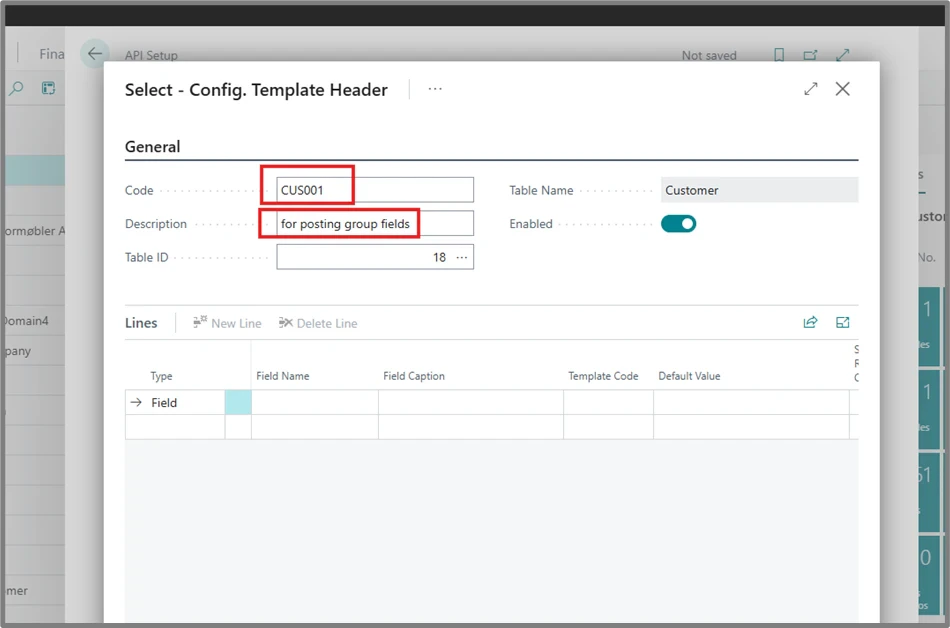
    In the “**Code**” section, enter any default code. For example, “**CUS001**”. In the “**Description**” section, enter a short description. For example, “**for posting group fields**”

    <Frame>
      <img src="https://mintcdn.com/cloudify-c7720744/lGXfg-sRr29fzWtD/images/image-528.png?fit=max&auto=format&n=lGXfg-sRr29fzWtD&q=85&s=5f960aa5db317e182db3b5753c1b5014" alt="Image" width="950" height="628" data-path="images/image-528.png" />
    </Frame>
  </Step>

  <Step>
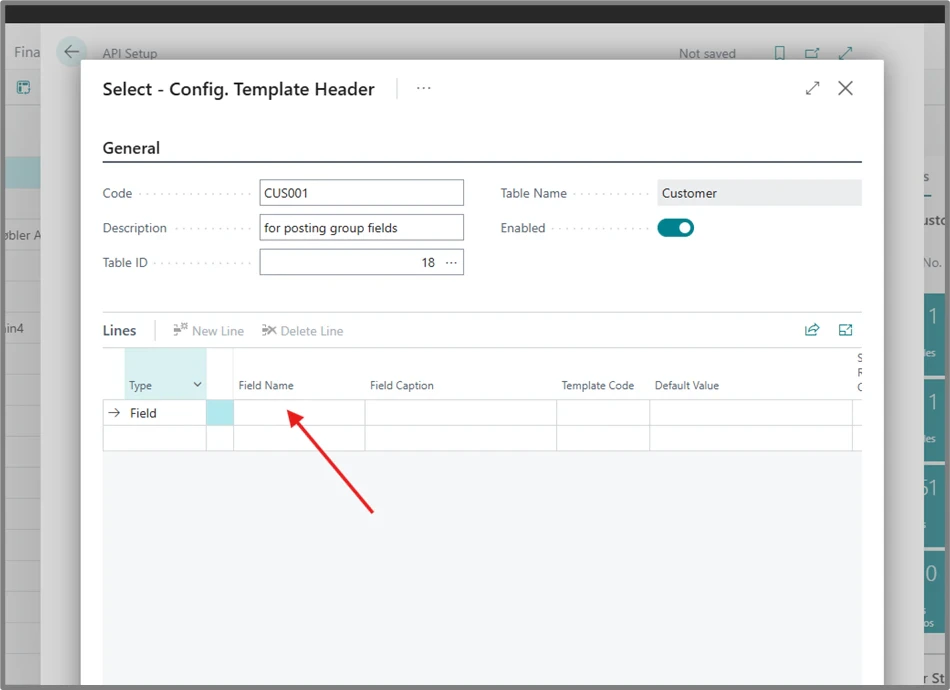
    Click on the empty space under “**Field Name**”

    <Frame>
      <img src="https://mintcdn.com/cloudify-c7720744/lGXfg-sRr29fzWtD/images/image-529.png?fit=max&auto=format&n=lGXfg-sRr29fzWtD&q=85&s=3866e08e9607c55c446c36b4ecb73b1f" alt="Image" width="950" height="690" data-path="images/image-529.png" />
    </Frame>
  </Step>

  <Step>
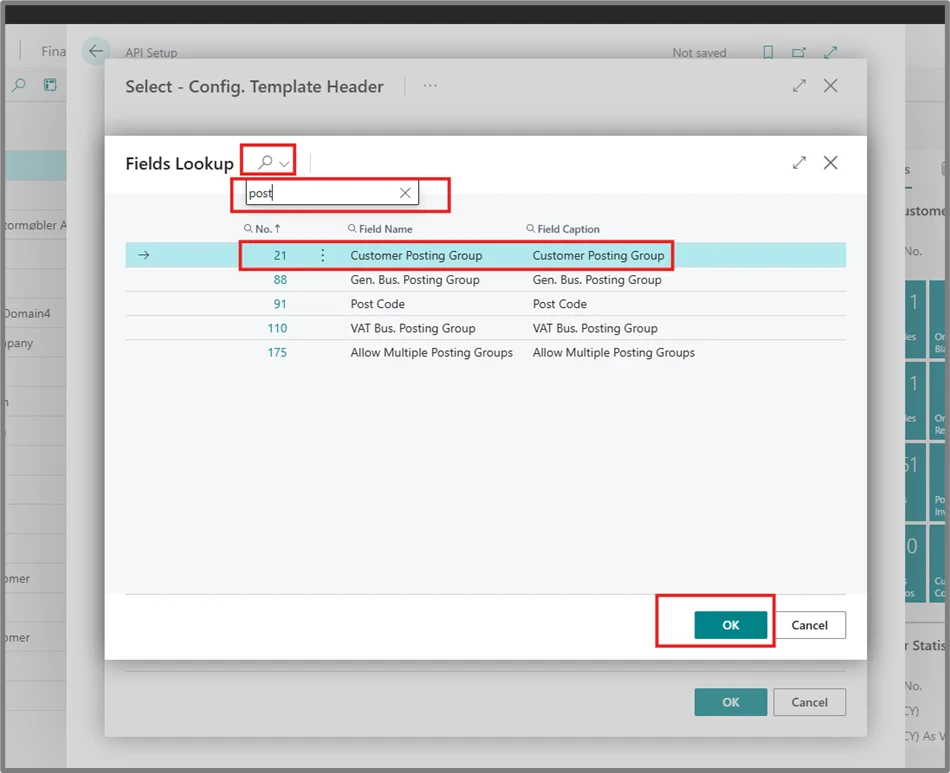
    Click on the search button and enter “**post**”. This will show all posting-group fields. Click on “**Customer Posting Group**” and press “**OK**”

    <Frame>
      <img src="https://mintcdn.com/cloudify-c7720744/lGXfg-sRr29fzWtD/images/image-530.png?fit=max&auto=format&n=lGXfg-sRr29fzWtD&q=85&s=5ebfc4fa5820fa13857ebea144a1e7c8" alt="Image" width="950" height="773" data-path="images/image-530.png" />
    </Frame>
  </Step>

  <Step>
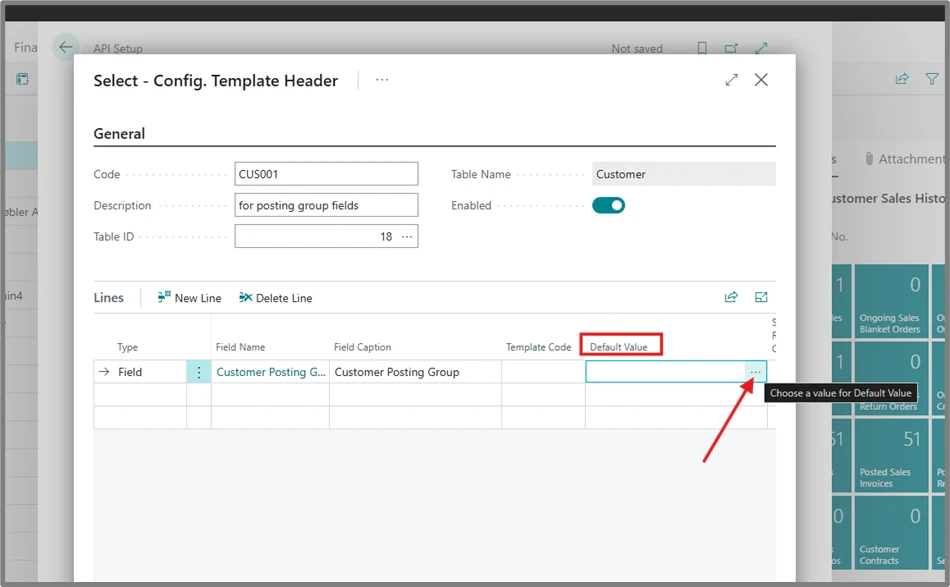
    Enter the Code and Description as shown below. Then click on the three-dots under “**Default Value**”

    <Frame>
      <img src="https://mintcdn.com/cloudify-c7720744/lGXfg-sRr29fzWtD/images/image-531.png?fit=max&auto=format&n=lGXfg-sRr29fzWtD&q=85&s=1370d520957e87b3391cda662231f0d2" alt="Image" width="950" height="587" data-path="images/image-531.png" />
    </Frame>
  </Step>

  <Step>
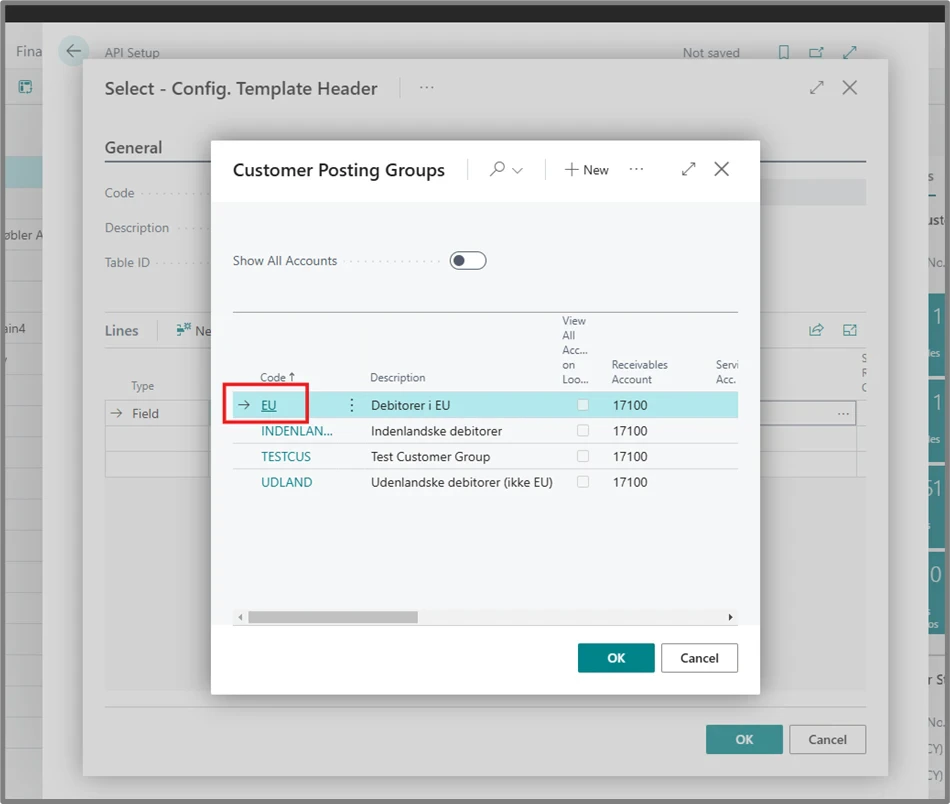
    Select a code from this list.

    <Frame>
      <img src="https://mintcdn.com/cloudify-c7720744/lGXfg-sRr29fzWtD/images/image-532.png?fit=max&auto=format&n=lGXfg-sRr29fzWtD&q=85&s=7c380adb7641876cb347facff3fc31e3" alt="Image" width="950" height="804" data-path="images/image-532.png" />
    </Frame>
  </Step>

  <Step>
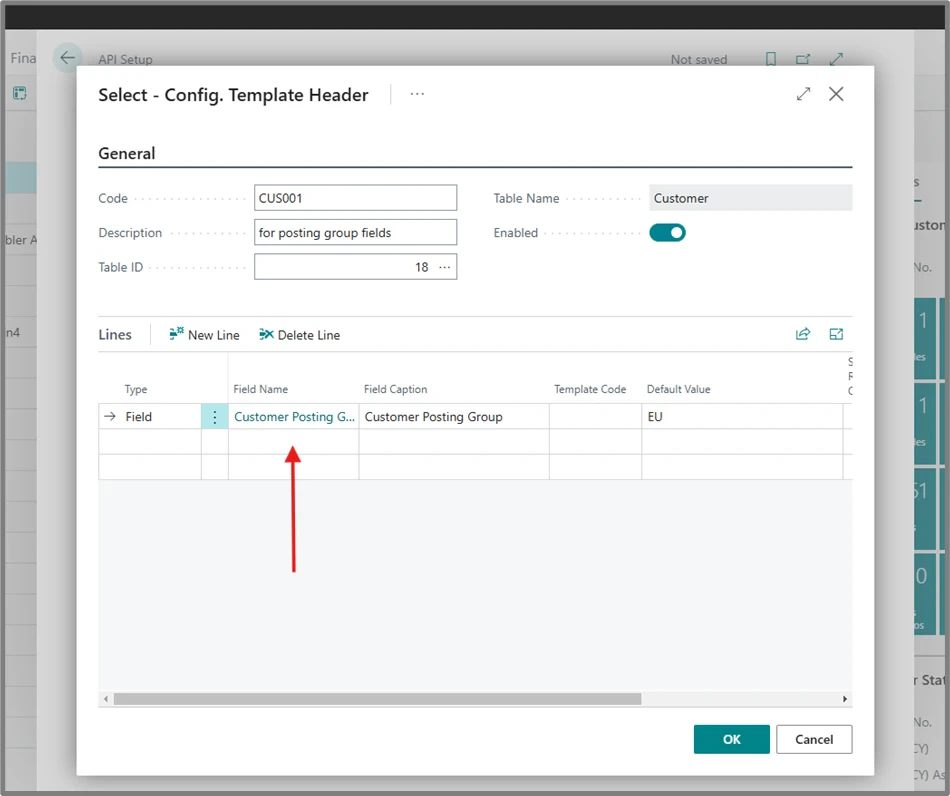
    Repeat the steps for the remaining posting-group fields. Click again on the empty space under the **Customer Posting Group** field name.

    <Frame>
      <img src="https://mintcdn.com/cloudify-c7720744/lGXfg-sRr29fzWtD/images/image-533.png?fit=max&auto=format&n=lGXfg-sRr29fzWtD&q=85&s=88fc3272977badbdb1fb89f77b34a13a" alt="Image" width="950" height="796" data-path="images/image-533.png" />
    </Frame>
  </Step>

  <Step>
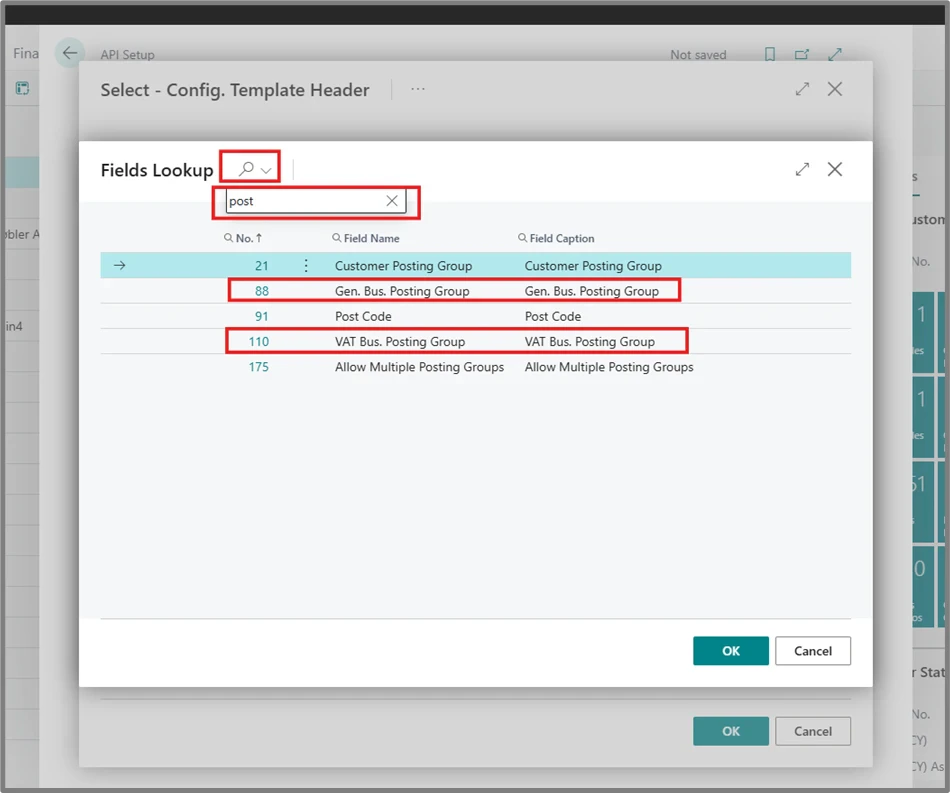
    Click on the search icon and type “**post**” again. Now add “**Gen. Bus. Posting Group**” first, followed by “**VAT Bus. Posting Group**”

    <Frame>
      <img src="https://mintcdn.com/cloudify-c7720744/lGXfg-sRr29fzWtD/images/image-534.png?fit=max&auto=format&n=lGXfg-sRr29fzWtD&q=85&s=2e0464a8c505686e446510ec45eca591" alt="Image" width="950" height="793" data-path="images/image-534.png" />
    </Frame>
  </Step>

  <Step>
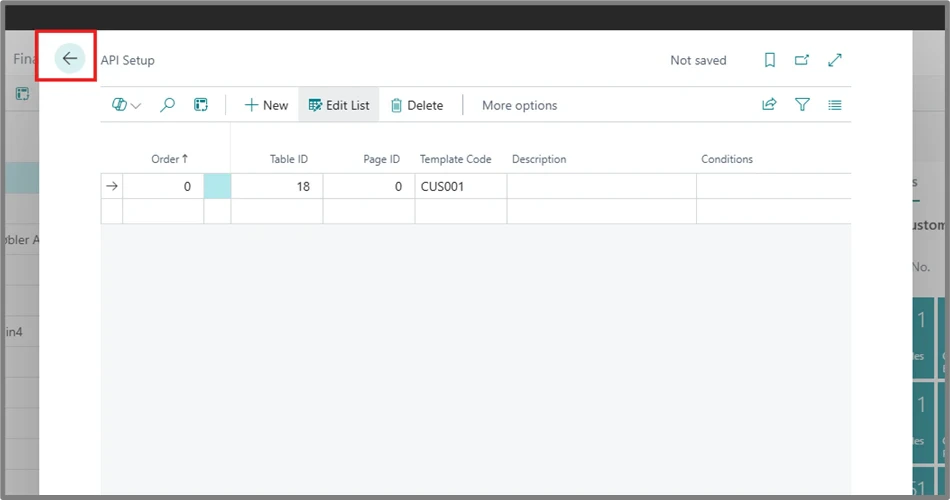
    Click on the back button or somewhere outside to close this window. 

    <Frame>
      <img src="https://mintcdn.com/cloudify-c7720744/lGXfg-sRr29fzWtD/images/image-535.png?fit=max&auto=format&n=lGXfg-sRr29fzWtD&q=85&s=fc82de8c98fe79c6b4a5bbd7016978c1" alt="Image" width="950" height="500" data-path="images/image-535.png" />
    </Frame>

    For any queries or concerns while setting up default values, please write to [support@cloudify.biz](mailto:support@cloudify.biz)
  </Step>
</Steps>