What exactly does this integration do?
What exactly does this integration do?
- Turn your Shopify orders into e-conomic invoices automatically
- Keep your Shopify and e-conomic product and customer data in sync
- Automate invoice generation and journal entries
- Monitor sync status through detailed logs
- Handle refunds and shipping charges automatically
I've installed the app, but how do I start creating the invoices?
I've installed the app, but how do I start creating the invoices?
I get this error with my integration: "The Workflow execution failed due to this error: The license is read-only."
I get this error with my integration: "The Workflow execution failed due to this error: The license is read-only."
Will the invoice be directly booked in e-conomic after it is created?
Will the invoice be directly booked in e-conomic after it is created?
- Create draft invoices that require manual review, or
- Generate automatically booked invoices
How do I know if my invoice was created successfully?
How do I know if my invoice was created successfully?
- View the “Notes” section in your Shopify order
- Check e-conomic for the newly created invoice
- Monitor any error messages under the Shopify order’s “Notes” section
Can I connect my Shopify store with multiple e-conomic accounts?
Can I connect my Shopify store with multiple e-conomic accounts?
What happens if my Shopify customer isn't in e-conomic?
What happens if my Shopify customer isn't in e-conomic?
- Customer information from Shopify
- Your configured default settings
- Mapped customer fields
What if my Shopify product isn't present or found in e-conomic when the integration runs?
What if my Shopify product isn't present or found in e-conomic when the integration runs?
- Halt the invoice creation (for manual review)
- Use a default product as a placeholder
- Automatically **I am unable to import my e-conomic customer and product data to Shopify with this application.**create new products in e-conomic from your Shopify order
I am unable to import my e-conomic customer and product data to Shopify with this application.
I am unable to import my e-conomic customer and product data to Shopify with this application.
I can't see the created invoice in e-conomic. What should I check?
I can't see the created invoice in e-conomic. What should I check?
- Check the Shopify order notes for any errors
- Verify your e-conomic connection status
- Confirm if it’s a draft or booked invoice (both are placed at different locations in e-conomic)
- Use the replay feature after making any changes (Go to your Shopify order > More actions > Replay invoice sync)
My custom field mappings aren't working. What should I check?
My custom field mappings aren't working. What should I check?
- Ensure field types match between systems
- Check required fields are properly mapped
There's a mismatch in invoice amounts between Shopify and e-conomic. What should I review?
There's a mismatch in invoice amounts between Shopify and e-conomic. What should I review?
- Tax inclusion/exclusion settings
- Shipping charge configuration
- Discount calculations
- Currency settings and conversions
Some customer/product/order information is missing on invoices. How can I fix this?
Some customer/product/order information is missing on invoices. How can I fix this?
How do I map the Shopify order number in the e-conomic invoice?
How do I map the Shopify order number in the e-conomic invoice?
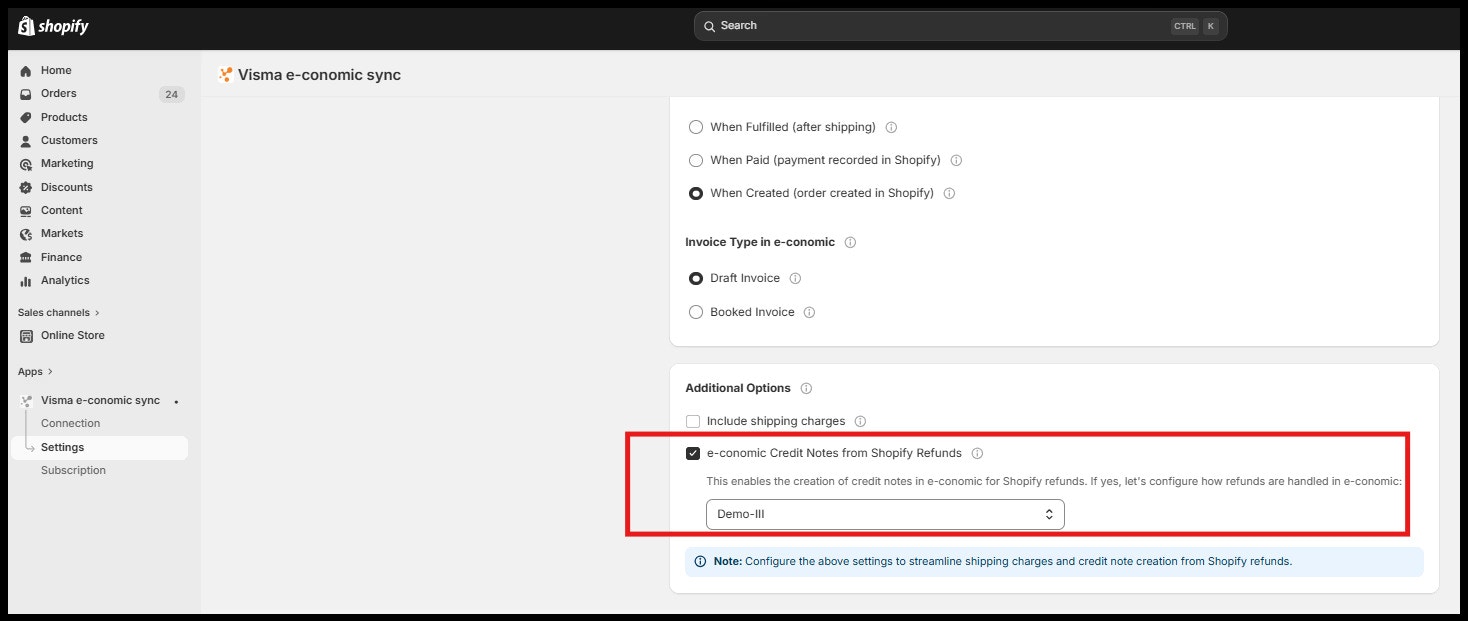
How to create credit notes in Economic for Shopify refunds?
How to create credit notes in Economic for Shopify refunds?
- Go to the e-conomic Sync app in Shopify
- Open Settings → Invoice Settings
- Scroll to Additional Options
- Enable the checkbox Create credit notes in e-conomic for Shopify refunds
- In the dropdown below, select the default product to use as the line item (this will appear as “Shopify Refund” with the refunded amount in the credit note)
- Click Save